Sunday, February 13, 2011

Vogue 1186 Issey Miyake Jacket

I purchased this Vogue Issey Miyake pattern shortly after it came out because the jacket had some interesting seaming.

You certainly can’t see the seams in the jacket on the pattern envelope. But the line drawings show them well.

I felt that if I was going to spend the time and effort to sew those curved seams, I wanted them to be visible is some way. I enlarged the line drawing and played around with my crayons. Besides the obvious color blocking options, another one I came up with was ombre coloration.

I pictured the fabric as wool where the color change was woven, not printed and there was texture or other interest in the fabric. I had no luck finding this fantasy fabric anywhere. I ordered some silk suiting and wool fabrics thinking I might ombre dye them myself, but I never got around to it. This fall I was browsing the Elliott Berman Textiles website and there was some fabric that had the ombre coloration I was looking for.
It was described as 2 Matelesse panels – made in Italy, with no info on fabric content.


It changed from a dark navy color at one end of the fabric to a bright green at the other end. I was hoping it was silk based on the price. It was on sale, but still above my $/yard comfort level. When it arrived the fabric proved to be quite interesting and unique. It was polyester, with a texture that resembled rough tree bark. The texture started out as ridges in the dark blue area and turned into cracks as they moved into the lighter bands of color. In the top green band the cracks were plentiful. The interiors of the cracks had shiny black fibers woven into them. The black fibers are actually thin flat polyester strips, very similar to the Sulky Sliver metallic thread you can buy for embroidery and embellishment. These strips float on the back of the fabric, except where they were woven into the cracks. The fabric was easy to cut and press, but no matter how thin and sharp the needles and pins I used, they often pushed the black strips through the layers to the outside of the fabric. Fortunately this did not cause a snag or pucker in the outer layer of the fabric so I finally just ignored it.


This jacket is a fair amount of work. The pattern includes the pieces for the interfacing at the sleeve hems, jacket hem, armhole and upper back, which was nice. Sewn in interfacing is recommended and that is what I used because I was unsure how well fusible interfacing would adhere to the polyester fibers. I laid out the pattern pieces so that color changed from mid tone to light on the sides of the jacket and dark to mid tone in the center of the jacket. I made the welt pockets out of a darker color than the surrounding fabric so they sort of resemble a belt as they go under the curved section. The pattern instructions are very good, describing the steps needed to complete the unique features and assembly order of this jacket. I had no trouble matching and sewing the curved seams. The only things I did not like about the instructions/pattern was the non functional sleeve vents. They were bulky when constructed as per the instructions. And instead of a button hole on the sleeve vent, the instruction have you make a line of chain stitching to look like a button hole.


I am really pleased with the finished jacket, and though the fabric is totally different than what I pictured, it did fulfill my vision. I am in the process of making a scoop neck top and wide leg pants (not from this pattern) of navy georgette to wear with the jacket. I plan to wear this outfit to a company sponsored reception and special viewing of the Pablo Picasso: Masterpieces from the Musée National Picasso, Paris exhibit at the VA Museum of Fine Arts.

Here is some picture of the jacket on me because I think it is important to show garments on real people, not just dress forms.


Friday, January 28, 2011

Earning My Stripes

Thanks for your suggestions on how to get past the distraction of too many potential new projects. I liked Valerie’s the best. “I think you should take a month or more off from work and get them all done!” Sigh, I wish! What I actually did was promise myself one of the new projects when my jackets were complete. Then I made a list of the sewing tasks remaining to be done on the jackets. Once they were written down, they weren’t so overwhelming and I finished them.

Why was I making two jackets at once? I recently lost two pieces of one of my older SWAP wardrobes. A pair of pants ended up miniaturized because of a poor laundry decision and a jacket had to be thrown away because the trim, made of faux leather, started to deteriorate and flake off the knit fabric backing. I replaced the pants using a TNT BurdaStyle pants pattern.

The fabric I wanted to use to replace the SWAP jacket was maroon wool with faint tan, pink and dark maroon stripes. So I was looking for a jacket pattern that could be made of a striped fabric. During my holiday break, the Jan 2011 issue of Burda Style arrived. The picture of Jacket #127 showed a high hip length, fitted jacket in a solid color. Closer study of the drawing of the pattern pieces revealed that it had a back peplum that was an extension (cut on) of the jacket front.


If the front of the jacket was cut out of a vertical striped fabric, the stripes in the curved peplum would be on the diagonal and they would chevron at the center back seam. I love details like that. Also the vertical dart on the jacket front has one leg parallel to the grain line /stripes and one at a slight angle. When the dart is sewn, the stripes to the outside of the dart would angle slightly up and outward. A nice look.
I have noticed that BurdaStyle often shows striped or plaid fabric in tops with the waist bust dart. I assume this is because this type of dart does not cause the eye jarring distortion of stripes and plaids like a side bust dart would.

There was another piece of striped fabric lying on top of my fabric heap that I also thought would work well with this pattern. In a burst of energy, I decided to cut two jackets using the same pattern, vaguely remembering this recommendation in a sewing book of "Time saving Techniques and Shortcuts for Busy Sewers". It said use fabrics that can be sewn with the same color thread, double the interfacing and lining so you cut the pieces for both jackets at the same time. Sew the jackets simultaneously repeating each step for both, with the real time savings coming from not having to read the directions or think through the construction steps on the second jacket. I reread the book after making the jackets and discovered there was a line I had forgotten. The author goes on to say "It seems a little tedious while sewing, but I always remind myself that in the end I will have two new jackets" Tedious is too nice a word to describe sewing multiple lapel collars, and setting in 8 sleeves, 4 in the garments, and 4 in the linings. And because stripes require careful layout and cutting, I think all the theoretical time efficiency was lost.

Both jacket fabrics were uneven stripes. An uneven or unbalanced stripe repeats the stripe pattern in only one direction on the fabric. An even or balanced stripe repeats the same pattern on both the right and left of the dominant stripe.


For a garment made from a vertical uneven stripe, you can choose to have the stripe repeat around the garment or be a mirror image on each side of the garment. For a repeat, cut the pattern pieces using the with nap layout which is with the fabric folded double with selvedges together, all garment pieces oriented top to bottom on the fabric.

For a mirror image, it is recommended that pattern pieces be cut out of a single layer of fabric. And the left side pattern pieces be in the opposite lengthwise direction as the right side pieces. Uneven lengthwise stripes will chevron only if mirror imaged at the seam.
Rather than cut out each pattern piece from a single layer of fabric, I chose to fold my fabric in half horizontally, making sure the stripes on both pieces were exactly aligned, and cut out each piece double. It achieves the same result.


The wool jacket has subtle stripes. The only one easily seen by the eye is the pink one and it repeats evenly across the fabric. So I used the with nap layout. The jacket works well with my old SWAP blouses.


The second jacket was made out of a 1.3 yard remnant of 54” cotton lycra green and burgundy stripe. I had to use every layout trick I knew of to get the jacket out of the available fabric. All seam allowances are 3/8 inch. The sleeves are ¾ lengths. And the upper collar and front facings below the roll line are pieced together from scraps.


Some of the stripe matching that a perfectionist would do was not possible because of limited fabric. The stripes at the shoulder seams and at lapel collar lines are not matched. I just went for symmetry of stripes on both sides of the jacket. This jacket is more casual and will be worn in warmer weather, if it ever gets here.


Even though my spring Vogue patterns have arrived, I will probably do a couple more winter sewing projects. The cold and dreary weather makes me want to sew warm fuzzy wools and flannel.

Magazine Sources

In answer to the questions about where I get some of the foreign sewing magazines shown in the picture from my last post.

Australian Stitches magazine


This magazines features fabulous garments made from the latest patterns (6 months behind the USA) with technical instructions, and step x step photos. They are known for sewing the garments and giving honest assessments of the style, fit and pattern instruction sheet. There are also articles on makeovers of real people with wardrobe-planning advice and the latest trends from the USA and Europe.

I have had a subscription for years through the Canadian company Stonehouse Publications.

www.stonehouse-publications.com Staff is available 9AM to 5PM Eastern Time, Monday thru Friday to answer any questions at 1-800-461-1640, and to assist with your order. They currently have a very good offer of 15 issues for the low price of $74.63 on their website or if you call. I have no idea how long this offer will last.

Russian Sewing Magazines

I have purchased trial (3 month) subscriptions to two Russian sewing magazines through a US distributor of Russian magazines called Podpiska.
Шитье и крой Translation:Sewing and Cut
Ателье Translation:Studio

Podpiska http://www.podpiska.us/

Contact Information:
Phone: 1-800-763-7475 (Personnel speaks Russian and English)
Fax: (617) 964-8753
E-mail: podpiska@unipressa.com

Address:
Unicont Enterprises, Inc.
1340 Centre St., Ste 209 .
Newton Centre, MA 02459-2453

60088 ШиК ( Шитье и Крой) This is the Item number and the Russian name of the magazine. You can copy /paste either of them into the search field on the web site to pull up the order info.
Subscription of 3 issues for $28.00


My description - This magazine is similar to European pattern magazines BurdaStyle, Patrones, Mia Boutique, KnipMode, etc. in that the patterns are printed on pages which can be removed from the magazine for tracing. However the garment styles are rather basic and conservative. Except for the styles of the featured Russian designer, which can be rather “different”. Each garment pattern is available in only one size, unlike the other pattern magazines which usually print each pattern in a range of sizes. One issue per year is an exact copy of a previously published Mia Boutique issue. The Nov 2010 issue of Sew and Cut was the Jan 2010 issues of Mia Boutique, same pictures, same patterns, and same sizes.

60073 Ателье This is the Item number and the Russian name of the magazine. You can copy /paste either of them into the Search feature on the web site to pull up the order info. Subscription of 3 issues for $28.00


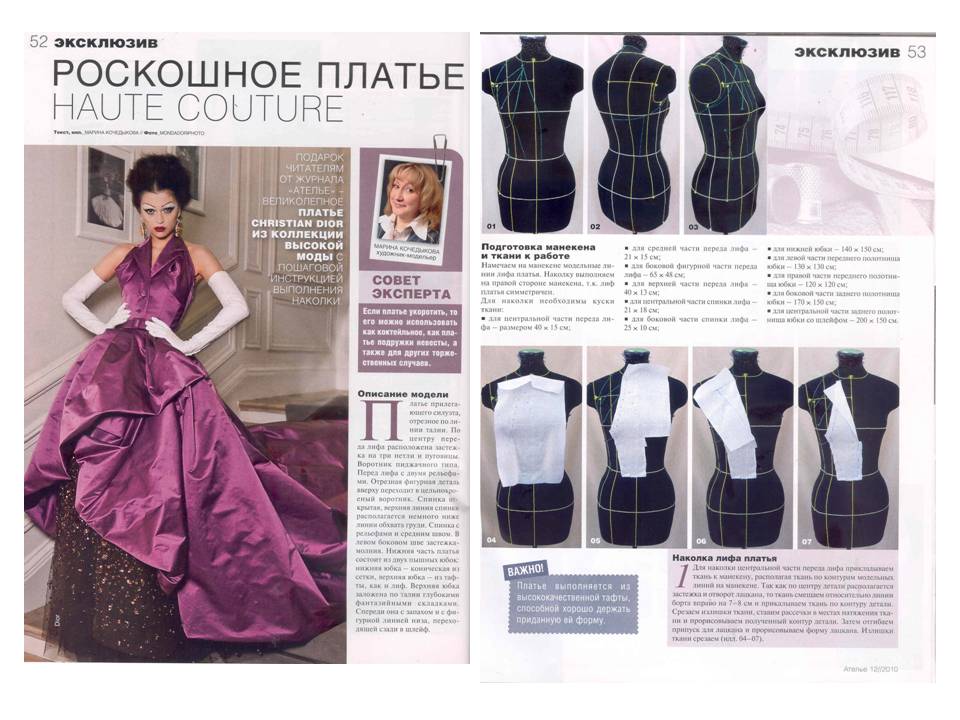
My Description - This magazine has articles on the latest trends in fashion, articles on drafting patterns using CAD software, and articles on couture level garment construction. There are also articles showing how to work from a fashion illustration or a picture of a garment and drape it on a dress form. I don’t believe there are typically patterns in the magazine, though the last issue had a number of dress patterns, each in one size only. In the Dec. issue there was an article on making the patterns for and sewing wonderful fur hats with shaped insets of contrasting fur.


And this article on draping this haute couture dress with pages of pictures of each step.


I wish there was an English language magazine with this same content.

Tuesday, January 11, 2011

Sewing Sensory Overload

Help, I am paralyzed by sewing sensory overload. I was nearing completion on two versions of this jacket from the Jan. issue of Burdastyle magazine when I received 5 sewing magazines and two vintage patterns all at once.
The magazines: Jan/Feb Threads which was a bit late, two issues of Stitches, the Jan issues of Studio and the Feb/Mar Vogue Patterns. So many ideas and new patterns, I can't focus.

The patterns for all these dress were in the Jan. issue of Studio, a Russian magazine about pattern drafting, designing and industry clothing construction. I want to make every one of them. They all have design details I have never sewn before.


Then the Vogue Pattern magazine arrived. This magazine has improved so much in the past year. More technique articles, and free patterns. They have even copied shamelessly from BurdaStyle. Vogue now has the line drawings of the garment on the photo page, and has the "styling one garment 4 ways" feature that Burda has. "Imitation is the sincerest form of flattery"

This issue has a lot of new patterns I want to buy, right now. Or at least put in my shopping cart on the Vogue pattern web site so the minute the BMV sale is announced, I can send in my order. Of course none of the new patterns are on the Vogue web site yet. It is so frustrating. Here are my favorites.

I love the ladylike sillouete and seaming on this dress.


And the neat released tuck detail at the neckline of this dress. This pattern is for knits. I am thinking of converting the dress to a top by cutting it off at the high hip.


This Donna Karan dress looks like they took one of the her knit crossover dress patterns and converted it for wovens. Interesting but a bit bulky looking.


I love this Donna Karan shirt dress, though I would make it in a lighter weight woven fabric than the one it is shown in.


This Pamela Roland dress is an update of the sleek lines and A line silhouette of my favorite 60's dresses.


I have the perfect silk print fabric for this Vena Cava dress, but I don't think I can carry off a shapeless silhouette like this one. I don't have the shoulders for it.


And my absolute favorite - the jacket in this wardrobe pattern. Interesting sleeves and seaming, open neckline, and pleated peplum. The perfect casual summer jacket.


Anybody have any suggestions how I can calm myself down and prioritize my next sewing projects?

Friday, December 24, 2010

Catching Up

My holiday preparations are under control and I have some time to answer reader questions.

There were a couple of questions on the Burda Curved Inset Jacket

Carolyn asked “Do you think if you had used 5/8" seam allowances on the curves that it wouldn't have lain as flat when the curves were cut? It's not that I'm disputing Burda's instructions, but rather thinking of how this would work with a big 4 pattern? Thanks

Response: I do think that when sewing a curved seam where you have to join an outward curve to an inward curve, a narrower smaller seam allowance eliminates extra fabric that has to be clipped, pinned, and manipulated while sewing. It also results in less fabric to iron flat. So all in all the narrower seam allowance probably does aid in achieving a good final result. In doing some research on your question. I found this on the Simplicity web site.

When is the seam allowance not 5/8"?
On very small pieces such as doll clothes, on small detail pieces such as belt carriers and in larger areas where you would need to trim away the excess seam allowance; we typically reduce the seam allowance to 3/8" or 1/4" to make your sewing easier.

However, I have rarely see seam allowances less than 5/8” on the big 4 patterns. I think reducing seam allowances may be one of the things a sewist will do based on their experience and confidence. It took a while for me to get away from the comfort of the 5/8 inch seam allowances used by the big four pattern companies, because that is what I “learned” in my early sewing experiences.

Barbara asked, "Did you interface all the jacket pieces? "

Response: I did not interface the jacket back or sleeve pieces. I did interface around the back neck and armholes openings as well as the sleeve and back hems. Whether to interface the back jacket pieces and sleeves is something I mentally mull over every time I make a jacket. The fabric weight and drape, and the style of the jacket is usually what determines if I interface all the garment pieces or not. I don't always make the best decision and have been know to interface pieces that are already sewn together.

Carolyn also asked about the closure on the Kwik Sew Fur Coat .

Response: There is an in-seam button hole in the seam between the collar and the jacket front. The button I chose blends in with the fur so well that even my son, who was standing 5 feet in front of me, commented he had trouble seeing it.

"42" commenting several days ago on an older post Bunka - Fundimentals of Garment Design asking “I am a little curious (not important, but fascinating) as to why so many Americans and Australians are using and in fact very much in love with Bunka Sloper? (an Asian sloper) What are the benefits of possessing this sloper? I myself are Chinese and I never knew that is it a treasure until I learned from you all through blogging.

Response: For me the motivation to use the Bunka sloper is that it is the base used to draft all the wonderful garments featured in the Ms. Stylebook and Lady Boutique magazines. And the sloper drafting instructions, which are diagrams rather than words, can be understood without reading Japanese. There are pattern drafting books available in the USA, but the garment styles included in those books are basic, limited, and are of the time the book was published. As you guessed the Bunka Asian sloper (either from the preprinted magazine insert or drafted from my measurements) still needed some changes to fit my taller, middle aged, non Asian body properly. But after making those changes, I have a sloper I can use to draft the magazine patterns.
i hope that answers all the outstanding questions.

My last bit of sewing this year was my holiday party dress. This year the dress was black. I don’t think I have ever had a black dress. I never been convinced by the Little Black Dress (LBD) marketing hype. I associate black dresses with somber occasions like funerals, or the uniforms worn by female members of choruses or orchestras. So I was a little startled to find myself gravitating towards black this year. After a little introspective thinking, I believe my color selection was driven by my state of mind and some stressful life events that occurred in Nov. and early Dec. when I was planning for the holiday parties. We were dealing with unexpected surgeries required by an elderly family member. Car repairs, insurance and legal hassles resulting from my car being hit (no injuries) by an out of control, non insured, non licensed, ESL driver. And a heavy work load. Fortunately the 2nd surgery was a success, the insurance company settled after 7 weeks of negotiations, and the work project was a resounding success.
The pattern is from a 2000 holiday issue of a Russian language version of Boutique pattern magazine. The dress is fitted, with waist inserts, cap sleeves, a scooped front and V back neckline.

I liked the fitted silhouette of the dress and came up with several options for the neckline trim. It was shown with the neckline trimmed with fur. I had an old mink collar I considered refashioning into fur trim similar to that shown in the picture. As another option I considered adding neckline flounces in a sheer sequined fabric. This idea came from a picture of a dress worn at the Melbourne Race posted by Gail
But in the interest of time, what I ultimately ended up using was a premade trim of faux jewels and sequins. It came in a curved piece that was pretty close to the dress front neckline curve, and straight yardage which I used on the back neckline. The trim was on sale for about $4.00, probably because the faux jewel fad is fading or perhaps over, but it worked for me in terms of cost and ease of application. I hand tacked the trim in place so it will be easy to remove and replace with a different trim.

The dress fabric is a lightweight wool crepe and it is lined in red and black print silk twill. It was very easy to accessorize with sheer hose and strappy sandals.


Here’s wishing everyone a happy holiday season, whatever holidays you celebrate! And a wonderful start to 2011!

Tuesday, December 7, 2010

Warning - Curves Ahead

I got a lot of practice sewing curved seams on my last project, which was jacket 103 from BurdaStyle Magazine Oct 2007. The magazine description: "A round bias cut insert vividly offsets the straight lines of the plaid as well as emphasizing the fitted silhouette of the short jacket. This combination of narrow lapels/reveres with an extra wide collar is also new."


I have liked this jacket since I got the issue because of the inserts and the fitted silhouette. It just took me a while to find a suitable fabric. Looking at the line drawing I was a little puzzled as to how the fitted silhouette was achieved without darts. There is only so much fitting in the bust area that can be done with curved sides seams.
To find out, I traced the patterns pieces and taped them together with removable clear tape. Because the traced pattern pieces have no seam allowances, taping the pieces together along the seams is a great way to check the accuracy of the tracing, the draft of the pattern and the silhouette. I found that some of the bust and hip shaping is done with the insert. The insert shape is not an exact duplicate of the cut out shape. The length of the curve is the same, but the shape of the curve on the insert is slightly different than the curve of the cut out. When the insert is sewn in the opening, it creates the same shape that a side bust dart and vertical bust dart would create.
Burda recommends a 3/8 inch seam allowance on all the curved seams of the jacket cutout and the insert. This is definitely a good tip, but a lot of clipping is required to get pucker free insertion.


The collar is a bit different, very wide compared to the lapel and with a collar stand only in the back neck area which makes it stand up nicely. The collar stand is yet another inset curve. And the insets have to sewn in the lining as well. Like I said, lots of curves. The wool blend fabric was purchased at Hancock’s.