Monday, December 26, 2016

Where is Audrey?

As you read this I am on a plane to South America. Chile specifically, to visit my oldest son who has been living and working in the capital city of Santiago for the past 10 month. Chile is long and narrow country.  It is  2,653 mi long, with an average width 109 mi. Comparatively, the area is slightly smaller than twice the size of the state of Montana. It will be the height of summer during our visit and we will be visiting urban and rural locations in the central part of the country, the  desert in the north, as well as a subtropical  offshore  island. 


There is so much travel info online. I have learned about packing cubes – rectangular nylon bags that help you save space when packing,  tips to avoid getting sick when choosing and eating at street vendors, travel clothing with  hidden pockets,  easy care and quick drying garments with anti-odor properties that allow longer wear periods between washing, ways to go ( to the bathroom ) in different countries.  It is amazing.

My on line reading influenced the planning and sewing  of my travel wardrobe.   My wardrobe will be loose tunic type tops worn over camisoles and tanks, with jeggings  or pants,  and comfortable shoes . For the most part the temp will be 60's to 80’s with minimal rain.  However the night temps in the desert are near freezing and we have one desert excursion planned that starts at 4 AM. I will travel from VA, which is cold in Dec, in light layers which I can use on desert night excursions.


Secret Pockets and Reversible Garments.

When I travel outside the US, I am always a bit paranoid about losing my passport or being pick pocketed. It doesn’t matter what country. So I put “secret” pockets in the front of pants, inside the front of coats and in other garments, where I can carry my passport, charge cards and ID close to my body. I made a bunch of secret pockets out of muslin and poly/cotton scraps. These are the type you sew into the inside front of pants by attaching them to the waistband facing. 

Sew in secret pockets


For knit tops I like to insert the  pocket in the side seam with an invisible zipper. I specifically looked for light weight invisible zippers that have mesh tapes instead of the regular weight tapes.  I believe these zippers are for use on lighter weight fabrics that would be weighed down by a standard invisible zipper. They are very hard to find and in limited colors. The difference is the zipper tapes are made of a lighter weight polyester mesh  versus the typical polyester twill weave.  The pocket itself is made out of skin colored knit to avoid see through.
Zipper tape types
Secret Pocket on Tank Top

I noticed my recent sewing projects all had a  bit or a challenge or  puzzle in the construction.  Sewing for this trip was no exception.  Reversible garments.  The first is the Style Arc Courtney top with different front panels.  A silk Asian print in purples and grays for side one and a rose and gray colored floral silk stripe on side two, with the rest of the top constructed of gray rayon spandex knit.  All fabrics from Denverfabrics.com.


And reversible knee length shorts. Fabric used was a stretch denim woven with black and white fibers resulting in black tweedy color on one side and white on the reverse.  Pattern is an old RTW (Sears I think) I took apart and used for a pattern. The fabric is from Fabric.com. I had been planning to make reversible pants from this fabric for a while.


All seams are flat felled to the black side. On the white side this looks like ¼ inch top stitching. The waist on the black side is black elastic, used both as an accent and also to prevent the stretch out that stretch denim does after wearing a short time.  I needed the waist to stay snug and elastic was the solution. While trimming the seam allowance for felling, I accidentally trimmed both seams allowances in the center front area.  Expletive hail storm!


Solution: a faux zipper placket.  Looks great on both sides.


  The leg edges on the black side are hemmed using a faced piece about the same width of a typical sewn jean hem.

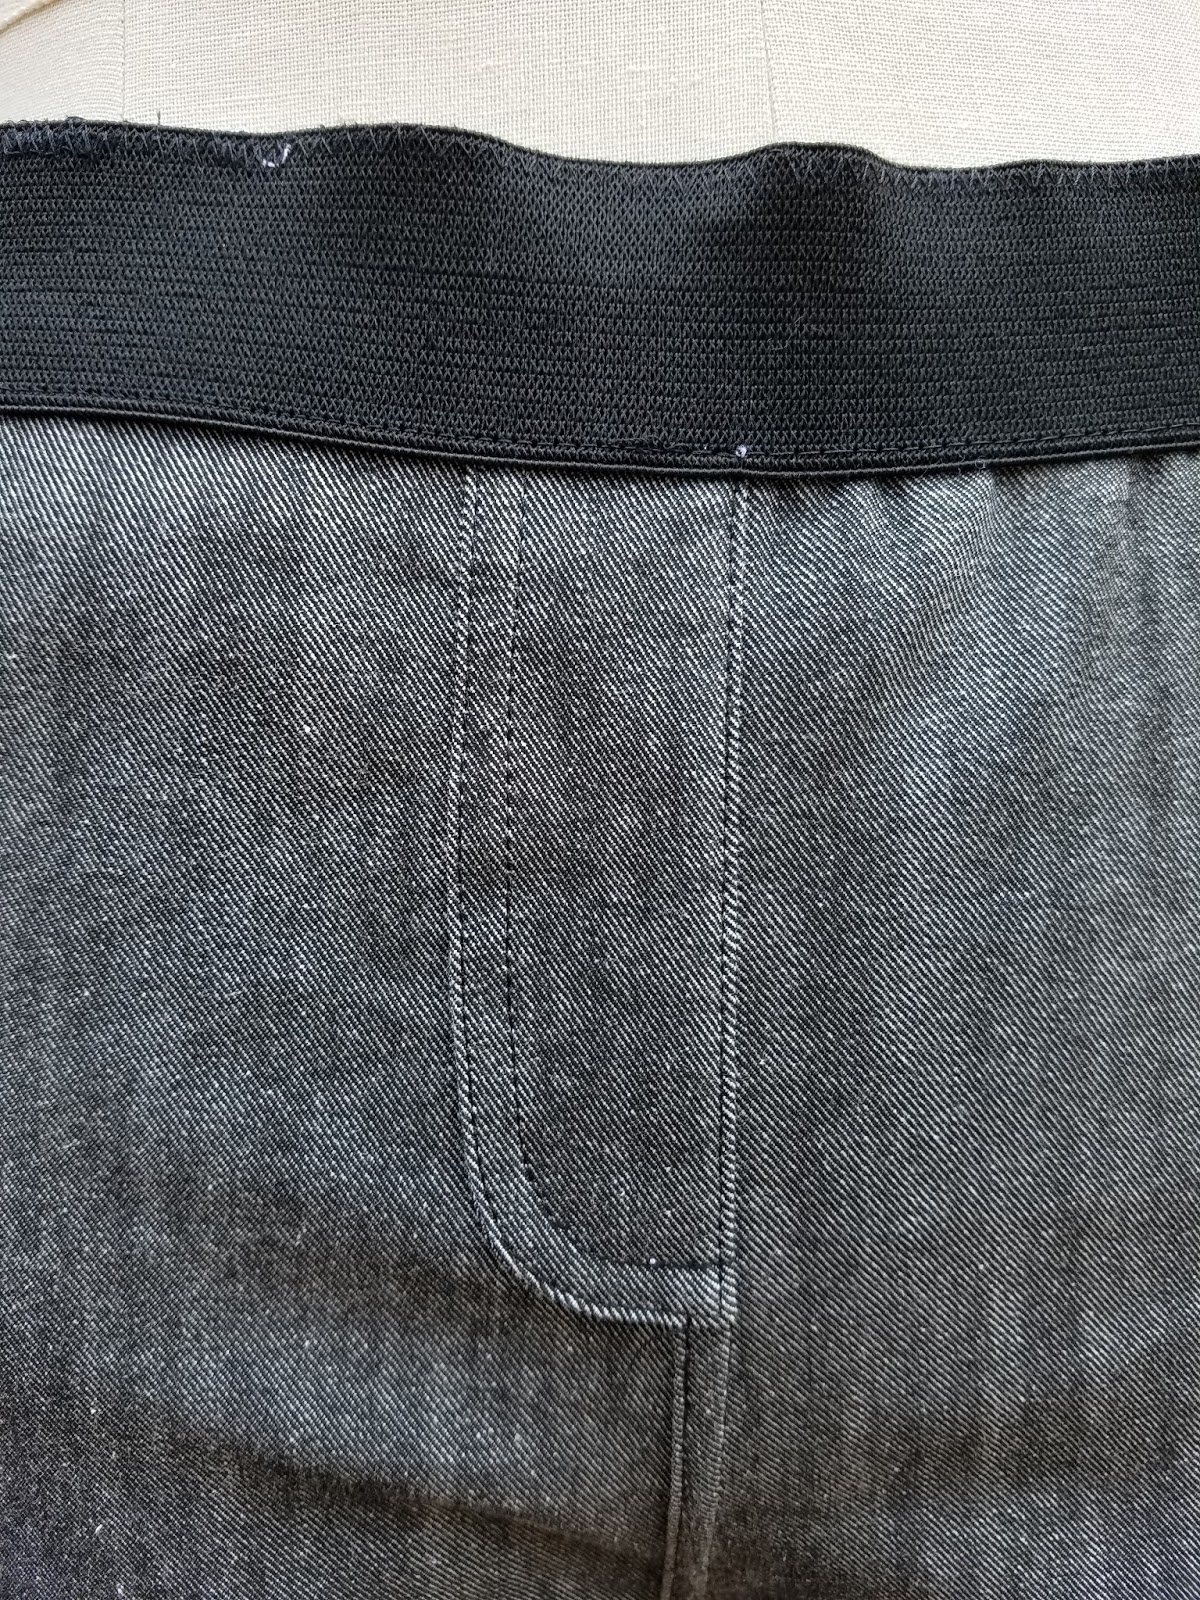
The secret pocket for these pants is on twill tape  tabs inserted between the elastic and the waist edge.  No matter which side I am wearing out, I  can flip the packet to the inside.

Secret Pocket on reversible pants


The other item I sewed for my travels is a cross body bag with water bottle compartment
The pattern is Cross-Body Hipster Bag with Water & Phone, sold by Lidija Miklavcic on Craftsy.


Cross-Body Hipster Bag 

It is a clever design for a medium size bag cross body bag which rides on your front, with separate compartments for your phone and water bottle. The front shoulder strap is designed to enclose your earphone wires, and position the ear pieces near your ears. It is a well drafted pattern with very good instructions.  It is still a bit of a challenge to sew.  Mine is sewn from gray leather from www.theleatherguy.org.  The lining is dark red nylon, backed with vinyl, scraps from a raincoat project in my UFO pile. I added some extra pockets inside the front strap, and finished the lining in a different way that the directions recommended.  My Galaxy 7 phone is too large for the pocket. The flap cannot close.  Next time I make it I will make the phone pocket larger.


Estoy listo para irme.

Sunday, December 4, 2016

Zip-a-dee-doo-dah - Burda 6637 Jacket


The weather has finally  cooled down and I actually feel like sewing winter clothes.  A recent  impulse fabric buy was a beautiful pink, purple, grey ombre brushed wool from Emmaonesock.com.  When an  online fabric vendor implements PayPay, as Emma One Sock did recently,  it become dangerous for me. Pay Pal eliminates the need for me to enter credit card info, which is when I ask myself, Do I really need this? (For fabric the answer is always No! ) Shortly after the fabric arrived, I saw this picture in my inspiration file.


And I just happened to have Burda Jacket pattern 6637 and some coordinating separating zippers in my stash.


The pattern description reads “ Both jackets have a slightly higher waist and easily lend a chic touch to any outfit. Although your favorite knit cardigan is great for a casual look, some occasions may call for a bit more elegance. Choose the jacket which suits your style and best flatters your figure.”

The inspiration jacket has a deep V  to the waist and a cutaway starting at the waist and  extending to the hem. The Burda pattern has a shorter V neck. I felt that the pattern was better for a convertible jacket, especially the cropped version because it would have small section of vertical front edge to use hooks and eyes to hold closed if desired.

Design Decisions I had to make.

1. Waist Seam Zipper – trim or functional – I decided to go with  a functional zipper so that bottom of the jacket could  removed.

2.  Zipper tape exposed or not – This decision determined the method of zipper application/ insertion and whether waistline seam allowance was needed. Exposed – could cut off seam allowance.  Non exposed, seam allowance needed  as zipper is inserted between lining and outer fabric.

3. Lining   -  Pattern is for unlined jacket.  I would have to draft a lining pattern.  The decision was Yes, a lining was definitely needed because the back of the wool flannel would catch on any garments worn underneath.

Additional changes for my body  - lengthening the back and shortening the front to get a horizontal waistline. Getting old is hell! Alterations for square, forward, narrow shoulders. This pattern has very wide shoulders. I removed about 1/2 inch in width.  I should have removed more. There is some extra fabric between the front armhole and the bust that bugs me.  It shows on the models on the pattern front too.

The fabric had two repeats of the ombre coloring just the right length to make it easy to cut and  match the colors across the jacket.


I ended up lining both the top and peplum to the edge of the waist seam even though I sewed the zipper tape to the outside of the fabric.  I reasoned that if I ever got tired of the zipper, I could remove it and sew the seam as designed.


I used two separating zippers. The separating ends were butted up to each other at center back.  Each zipper closed as it went from back to front.  In the front where the zipper extended past the front edge, I removed about 4 teeth on each side with wire cutter pliers.   I  removed the metal stops at the end of the zipper with the pliers and relocated them to the tape where the teeth ended at center front. I cut off the excess zipper tape at the end of the section where I removed the teeth, and turned it under.
Zipper Modifications

Zipper Modification Tools
I hand basted the closed zipper to the jacket top and peplum, making sure center back, side seams and darts lined up vertically. I top stitched the zipper in place near the zipper teeth and again near the outer edge of the zipper tape.


Back Zipper

Front Zipper


Photographing  sewn garments is  difficult in the winter. It is dark when I leave for work and dark when I get home, so weekends are the best time for outdoor photography.  But my idea of an ideal  winter weekend  is one where I do not have to leave the house. Comfortable clothes, no makeup, sewing, reading etc. I swear I have a hibernation mode. The only reason there are photos of the jacket on me is that DH, DS2 and I had to go to a nearby drugstore and get our Hepatitis A and Typhoid immunizations for an upcoming trip.   If I was going to get dressed for shots, it might as well be in my new jacket.
.


Cropped


Monday, October 31, 2016

Halloween Post


I am so proud of myself. I  sewed an ensemble, a complete outfit.  It included a statement jacket with trim details like this Givenchy jacket currently available at Pert-A-Porter,  a top with

the gathers and  ruffles that are so on trend, and a pair of loose fitting cropped pants.  Unfortunate it is not for me, but for a client that want to look like this for an event.


Yes, my client wanted a Captain Morgan costume.  Captain Morgan being a brand of rum that features a rather dandified “pirate” on the label. But I did find similar coats on historic figures of the early 18th century
Wardrobe of Peter I Russia
Admiral Edward Russell (1652–1727),
I used Simplicity pattern  4923 , a still available, still very popular pattern for costumes and historical garments.


The jacket is knee length with gores inserted at side and center back.  The sleeves are shaped, and have gigantic cuffs.

Captain Morgan Jacket


Captain Morgan Jacket side

Captain Morgan Jacket trim detail
The fabric I used was poly cotton (JoAnn’s).  The  pattern called for 6 yards of 45" wide fabric. I used  5 yards with the only compromise being that  pocket flap and cuff linings were cut  on the lengthwise grain.  The trim is gold, medium weight linen/rayon strips with finished width = 1”.   For trim used on front button area, the fabric was cut on straight of grain.  The trim for all edges where there was curvature,  hem, neckline and hat brim, was bias cut.  I used the bias maker for the straight grain strips too, in order to speed up turning under the  seam allowances. Needless to say, my 1 inch bias maker and edge stitch foot got a workout on this project. 22 large buttons were needed for the version of the  coat I made. Big buttons are expensive and any store in my area only has a couple cards of the same style. My solution: I found a large bag of cheap white plastic buttons. There were 25 buttons of the same size, but not the same face design. Disregarding that, I strung them all on a  piece of cotton twine between two deck chairs,  spray painted them all gold, let them dry and sewed them on. 


Spray Painted Buttons

The shirt was very loose fitting with gathers everywhere, neck edge,  and on the sleeves at both shoulder and cuffs.  The fabric for shirt was a 100% cotton twin size sheet.  I purchase white cotton sheets, when they are on sale,  for muslin, costumes and curtain linings.   My client could not tie the collar closed on his 16” neck so he wore the shirt open. However the front slit is 14” deep which revealed a bit too much hairy man chest, so I tacked the slit closed for bottom 6”. The client could still pull shirt on over his head.

Shirt Simplicity 4923

The pants or breeches are calf length with authentic bagginess in the front and back crotch area, and buttons on lower side seams.  The front closure is a flap that buttons to front waist band.  Fabric used was a navy medium weight rayon/linen.


Captain Morgan also has a hat. Not a plain black pirate  No, his is red with gold trim. A bit to matchy, matchy for my taste, but my client wanted it.  Researching "make your own  pirate hat" on the internet, I found  the easiest ones  started with  a woman's brimmed  hat. You cover them with felt or leather look material, and turn up and tacking the brim to the crown in three equal sections.  I found the hat below in the sale bin at JoAnn's.


I attempted to spray paint the hat red, starting with the upper brim and crown. It looked like a spray-painted straw hat. Time was running out, so in the end we settled for a black brim with gold trim.

Captain Morgan Pirate Hat


Boot covers were planned, but  there was no time for them either so Captain Morgan wore tall leather work boots. My client was very happy. He got lots of compliments and requests for photo's.

Captain Morgan and swashbuckling sidekick