Saturday, April 16, 2011

Spring Break Sewing

Long time, no post. Life has been busy lately. Stuff like odd work schedules. I am too old to work the 11:00 PM to 7 AM shift. I end up feeling horrible and getting sick. And then there were several weekends spent visiting colleges so my eldest son can make a decision on where he will go to school after his June high school graduation. In my sewing class, I gave up on an "inspired from nature" design. Instead I drafted my own pattern for this Giancarlo Ferre jacket, which is what I really wanted to do , and sewed it up. The jacket has some interesting seam lines which are hard to see in the photo. I will describe that process in a future post. It is time for our spring vacation. This year we are staying domestic, but we are going to the southernmost city in the continental USA. That would be Key West, Florida. Followed by a couple days in the South Beach area of Miami. I suspect my travel co-coordinator, DH, is trying to revisit a favorite trip we made 30 years ago. He denies it though. Do I need any new clothes for this vacation? No. But I like having an excuse to sew garments that are not what I usually sew which is work clothes. So I made the one shoulder T shirt from McCalls 6326 out of a some pink and turquoise cotton lycra knit. It is left over from the 80’s when I made leotards to wear to my aerobic dance classes. But I still like the colors in the print. McCall’s pattern have so much wearing ease, I normally drop down a size when sewing one. On this pattern I had to drop down two sizes and make SBA. I like negative wearing ease in knit garments i.e. the finished measurement of the garment is slightly smaller than my body measurements. This was especial important in keeping this top up. It is a quick to make pattern. And the Burda “Mila” dress. a free downloadable pattern from http://www.burdastyle.com. The fabric used in the dress is a piece of white and blue cotton lycra print from a FFM free bundle and a blue/white cotton oxford from Hancock’s. What I liked about this pattern is the contrast top front and placket creates a strong T shape that breaks up a large print used on the front sides. You can leave the front closures open and see the under top. The Burda free patterns can be printed out on 8.5 X 11 inch paper on your home printer and them taped together to create the full pattern. The sewing directions, on a separate download, are good. The only disappointment was that there are no layout directions for the contrasting fabric version shown in the pictures. There is a fake front under the placket which can be seen by leaving the placket unhooked at the top. The necklines of both the outer front and the inner front are to be finished by bias binding. I used the bias binding only on the outer top neckline. My fabric, being mostly white, was slightly see through so I lined the dress with a rayon fabric including the under top, This dress seemed to run large. I made a 42 which is normal for me with Burda patterns. It was reminding me of the shapeless cheap cotton house dress like those worn by some of my older female relatives when I was a child. So I converted the pleats in the back to long darts, and took in the side seams in the bust area. I still need to sew the 12 pairs of hooks and eyes to the front placket of this dress. I hope to get some photos of these two pieces on me in situ, and give you a review of the two fabric stores in Key West.

Monday, March 14, 2011

Procrastination - Burda dress 110

What have I been sewing in the last few weeks? Muslin fitting shells and collars. My sewing buddy T. and I arranged private classes with a favorite instructor on the G Street Fabrics education staff. In the most recent classes we drafted princess line patterns, both armhole and shoulder type, from our darted sloper and fine tuned the fit on multiple muslin shells. We also drafted and draped various styles of collars. The collar activity was a lot of fun and I finally understand the relationship between the shape of collar pattern pieces and the form of the sewn collar. Every drafting and fitting classes I take has resulted in self discovery about my shape and silhouette. Not all of it pleasant or encouraging. For me the alterations I have to make to deal with my asymmetry really bother me. Sometimes it takes me a couple of days and multiple phone calls to T. to come to terms with my discoveries and get the end goal in focus again: well fitted, flattering, custom sewn garments. Our next class assignment is straight from Project Runway. We are to create a design from an inspiration in nature and execute it into a finished garment. On hearing the assignment, I felt panicked, and procrastination mode kicked in. Since we are to be the ultimate model and wearer of the final garment, the instructor recommended a custom croquis for our design sketches. Croquis is French and means simply "sketch". In fashion, the term refers to a quick sketch of a figure with a loose drawing of the clothes that are being designed. This figure is typically 9 heads tall as this is the accepted proportions for fashion illustration. Here is an example.
Real people are typically 7.5 to 8 heads tall. So a custom croquis, made from my own body, would give me a better idea of how a design would look on me. The article "Discover the Best Proportions and Styles for You" in Threads Magazine June/July 2006 (#125) issue has easy to understand instructions on how to make your own croquis. Sorry, I could not find the article online. So one day, when the boys were out of the house, I followed the article's directions. I took pictures of myself in my underwear standing against a white wall, camera set up about 8 feet away on a table at waist height. I took photos of various poses, including the frontal zombie pose, which is good for evaluating your proportions against standard proportions, as well as other poses that were more “fashiony”. I cropped the excess background out of the photos, enlarged them so that my body was about 8 inches high and printed them in portrait mode on regular printer paper; I put tracing paper over the photo and traced the outlines of my body with a fine tip black marker.
Then to test my croquis, I sketched five dress styles I was considering for my next sewing project. Some looked nice, some just okay and some were no way. I’ll let you judge for yourself


I chose one of the more flattering styles to sew. I wanted to see if it would look anything like my croquis sketch. It was the gathered front dress, 110, from the March 2011 issue of Burda Style,
I really wanted to make this dress in light weight stretch linen. Of course I did not have any of that fabric in my stash. The recommended fabric is stretch silk satin. All of the stretch satins I have ever seen are fairly substantial. The fabric in the picture looks like stretch charmeuse to me. This dress really does need to be made from a very thin, soft, stretch fabric because each pattern piece is cut twice from a double layer of fashion fabric, and one set of pieces is used as the lining. And the lining is gathered at the center front and shoulders just as the garment is. The only soft, thin, woven stretch fabric I could find was a mystery fabric from the $2.97/yard table at G Street Fabrics. It was not just stretchy, it was super stretchy. I can run and do high kicks in this dress. Although it was thin, I decided to use the fashion fabric only for the lining in the armhole/neckline area. I added a horizontal seam about 3 inches below the armholes, and made the lining below the seam from nylon tricot. If I had a do over of this dress I would eliminate the gathering at the lining shoulder seam. It makes the shoulders are a bit thick.
This dress has some instructions for less common techniques. The gathering has to be pulled up to specific lengths on the individual garment pieces before sewing the seams on the center front and shoulders . The gathering on the front seam has one section over the bust that has to be gathered tightly to one finished length, but the adjoining section in the waist hip area is loosely gathered to a different length. I was having difficulty fixing the gathering threads so that the gathers stayed at the proper length. I improvised and used what I call "gathering guides". I marked the finished length of the gathers on thin strips of silk organza which I sewed to the gathered sections to hold them in place until I sewed the center front and shoulder seams.
There is a slit in the top of the center front seam that the tie goes through. There are no markings for the slit on the pattern pieces because it is marked after the gathering is done. I searched for marks indicating the location of the slit, thinking I had made a tracing error, before I figured this out.


The directions include a common Burda method for sewing the lining to the arm holes and neck opening of a sleeveless top/dress. It is often illustrated with a picture of a shoulder seam over the handle of a wooden spoon. This method can be hard to figure out from written instructions and can trigger binges of Burda bashing, even from experienced sewists. The method works great, as does a wooden spoon or wooden dowel rod as a pressing aid, if you know how to do it. An alternate method is this one shown in a great tutorial called Lining a sleeveless dress at Stichywitch's blog.

Here is the finished dress. I am in the same pose I used for the croquis. It does look remarkably similar.
That means I probably won’t be making the Vogue dress shown above, even though it uses a neat technique with wired ribbon on the front neckline that I really want to try. If my sketch is accurate, the dress will make me look like a human bowling pin. Sigh. Enough procrastination. I am off to pick a nature inspiration and come up with a garment design before Friday's class.

Sunday, February 13, 2011

Vogue 1186 Issey Miyake Jacket

I purchased this Vogue Issey Miyake pattern shortly after it came out because the jacket had some interesting seaming.

You certainly can’t see the seams in the jacket on the pattern envelope. But the line drawings show them well.

I felt that if I was going to spend the time and effort to sew those curved seams, I wanted them to be visible is some way. I enlarged the line drawing and played around with my crayons. Besides the obvious color blocking options, another one I came up with was ombre coloration.

I pictured the fabric as wool where the color change was woven, not printed and there was texture or other interest in the fabric. I had no luck finding this fantasy fabric anywhere. I ordered some silk suiting and wool fabrics thinking I might ombre dye them myself, but I never got around to it. This fall I was browsing the Elliott Berman Textiles website and there was some fabric that had the ombre coloration I was looking for.
It was described as 2 Matelesse panels – made in Italy, with no info on fabric content.


It changed from a dark navy color at one end of the fabric to a bright green at the other end. I was hoping it was silk based on the price. It was on sale, but still above my $/yard comfort level. When it arrived the fabric proved to be quite interesting and unique. It was polyester, with a texture that resembled rough tree bark. The texture started out as ridges in the dark blue area and turned into cracks as they moved into the lighter bands of color. In the top green band the cracks were plentiful. The interiors of the cracks had shiny black fibers woven into them. The black fibers are actually thin flat polyester strips, very similar to the Sulky Sliver metallic thread you can buy for embroidery and embellishment. These strips float on the back of the fabric, except where they were woven into the cracks. The fabric was easy to cut and press, but no matter how thin and sharp the needles and pins I used, they often pushed the black strips through the layers to the outside of the fabric. Fortunately this did not cause a snag or pucker in the outer layer of the fabric so I finally just ignored it.


This jacket is a fair amount of work. The pattern includes the pieces for the interfacing at the sleeve hems, jacket hem, armhole and upper back, which was nice. Sewn in interfacing is recommended and that is what I used because I was unsure how well fusible interfacing would adhere to the polyester fibers. I laid out the pattern pieces so that color changed from mid tone to light on the sides of the jacket and dark to mid tone in the center of the jacket. I made the welt pockets out of a darker color than the surrounding fabric so they sort of resemble a belt as they go under the curved section. The pattern instructions are very good, describing the steps needed to complete the unique features and assembly order of this jacket. I had no trouble matching and sewing the curved seams. The only things I did not like about the instructions/pattern was the non functional sleeve vents. They were bulky when constructed as per the instructions. And instead of a button hole on the sleeve vent, the instruction have you make a line of chain stitching to look like a button hole.


I am really pleased with the finished jacket, and though the fabric is totally different than what I pictured, it did fulfill my vision. I am in the process of making a scoop neck top and wide leg pants (not from this pattern) of navy georgette to wear with the jacket. I plan to wear this outfit to a company sponsored reception and special viewing of the Pablo Picasso: Masterpieces from the Musée National Picasso, Paris exhibit at the VA Museum of Fine Arts.

Here is some picture of the jacket on me because I think it is important to show garments on real people, not just dress forms.


Friday, January 28, 2011

Earning My Stripes

Thanks for your suggestions on how to get past the distraction of too many potential new projects. I liked Valerie’s the best. “I think you should take a month or more off from work and get them all done!” Sigh, I wish! What I actually did was promise myself one of the new projects when my jackets were complete. Then I made a list of the sewing tasks remaining to be done on the jackets. Once they were written down, they weren’t so overwhelming and I finished them.

Why was I making two jackets at once? I recently lost two pieces of one of my older SWAP wardrobes. A pair of pants ended up miniaturized because of a poor laundry decision and a jacket had to be thrown away because the trim, made of faux leather, started to deteriorate and flake off the knit fabric backing. I replaced the pants using a TNT BurdaStyle pants pattern.

The fabric I wanted to use to replace the SWAP jacket was maroon wool with faint tan, pink and dark maroon stripes. So I was looking for a jacket pattern that could be made of a striped fabric. During my holiday break, the Jan 2011 issue of Burda Style arrived. The picture of Jacket #127 showed a high hip length, fitted jacket in a solid color. Closer study of the drawing of the pattern pieces revealed that it had a back peplum that was an extension (cut on) of the jacket front.


If the front of the jacket was cut out of a vertical striped fabric, the stripes in the curved peplum would be on the diagonal and they would chevron at the center back seam. I love details like that. Also the vertical dart on the jacket front has one leg parallel to the grain line /stripes and one at a slight angle. When the dart is sewn, the stripes to the outside of the dart would angle slightly up and outward. A nice look.
I have noticed that BurdaStyle often shows striped or plaid fabric in tops with the waist bust dart. I assume this is because this type of dart does not cause the eye jarring distortion of stripes and plaids like a side bust dart would.

There was another piece of striped fabric lying on top of my fabric heap that I also thought would work well with this pattern. In a burst of energy, I decided to cut two jackets using the same pattern, vaguely remembering this recommendation in a sewing book of "Time saving Techniques and Shortcuts for Busy Sewers". It said use fabrics that can be sewn with the same color thread, double the interfacing and lining so you cut the pieces for both jackets at the same time. Sew the jackets simultaneously repeating each step for both, with the real time savings coming from not having to read the directions or think through the construction steps on the second jacket. I reread the book after making the jackets and discovered there was a line I had forgotten. The author goes on to say "It seems a little tedious while sewing, but I always remind myself that in the end I will have two new jackets" Tedious is too nice a word to describe sewing multiple lapel collars, and setting in 8 sleeves, 4 in the garments, and 4 in the linings. And because stripes require careful layout and cutting, I think all the theoretical time efficiency was lost.

Both jacket fabrics were uneven stripes. An uneven or unbalanced stripe repeats the stripe pattern in only one direction on the fabric. An even or balanced stripe repeats the same pattern on both the right and left of the dominant stripe.


For a garment made from a vertical uneven stripe, you can choose to have the stripe repeat around the garment or be a mirror image on each side of the garment. For a repeat, cut the pattern pieces using the with nap layout which is with the fabric folded double with selvedges together, all garment pieces oriented top to bottom on the fabric.

For a mirror image, it is recommended that pattern pieces be cut out of a single layer of fabric. And the left side pattern pieces be in the opposite lengthwise direction as the right side pieces. Uneven lengthwise stripes will chevron only if mirror imaged at the seam.
Rather than cut out each pattern piece from a single layer of fabric, I chose to fold my fabric in half horizontally, making sure the stripes on both pieces were exactly aligned, and cut out each piece double. It achieves the same result.


The wool jacket has subtle stripes. The only one easily seen by the eye is the pink one and it repeats evenly across the fabric. So I used the with nap layout. The jacket works well with my old SWAP blouses.


The second jacket was made out of a 1.3 yard remnant of 54” cotton lycra green and burgundy stripe. I had to use every layout trick I knew of to get the jacket out of the available fabric. All seam allowances are 3/8 inch. The sleeves are ¾ lengths. And the upper collar and front facings below the roll line are pieced together from scraps.


Some of the stripe matching that a perfectionist would do was not possible because of limited fabric. The stripes at the shoulder seams and at lapel collar lines are not matched. I just went for symmetry of stripes on both sides of the jacket. This jacket is more casual and will be worn in warmer weather, if it ever gets here.


Even though my spring Vogue patterns have arrived, I will probably do a couple more winter sewing projects. The cold and dreary weather makes me want to sew warm fuzzy wools and flannel.

Magazine Sources

In answer to the questions about where I get some of the foreign sewing magazines shown in the picture from my last post.

Australian Stitches magazine


This magazines features fabulous garments made from the latest patterns (6 months behind the USA) with technical instructions, and step x step photos. They are known for sewing the garments and giving honest assessments of the style, fit and pattern instruction sheet. There are also articles on makeovers of real people with wardrobe-planning advice and the latest trends from the USA and Europe.

I have had a subscription for years through the Canadian company Stonehouse Publications.

www.stonehouse-publications.com Staff is available 9AM to 5PM Eastern Time, Monday thru Friday to answer any questions at 1-800-461-1640, and to assist with your order. They currently have a very good offer of 15 issues for the low price of $74.63 on their website or if you call. I have no idea how long this offer will last.

Russian Sewing Magazines

I have purchased trial (3 month) subscriptions to two Russian sewing magazines through a US distributor of Russian magazines called Podpiska.
Шитье и крой Translation:Sewing and Cut
Ателье Translation:Studio

Podpiska http://www.podpiska.us/

Contact Information:
Phone: 1-800-763-7475 (Personnel speaks Russian and English)
Fax: (617) 964-8753
E-mail: podpiska@unipressa.com

Address:
Unicont Enterprises, Inc.
1340 Centre St., Ste 209 .
Newton Centre, MA 02459-2453

60088 ШиК ( Шитье и Крой) This is the Item number and the Russian name of the magazine. You can copy /paste either of them into the search field on the web site to pull up the order info.
Subscription of 3 issues for $28.00


My description - This magazine is similar to European pattern magazines BurdaStyle, Patrones, Mia Boutique, KnipMode, etc. in that the patterns are printed on pages which can be removed from the magazine for tracing. However the garment styles are rather basic and conservative. Except for the styles of the featured Russian designer, which can be rather “different”. Each garment pattern is available in only one size, unlike the other pattern magazines which usually print each pattern in a range of sizes. One issue per year is an exact copy of a previously published Mia Boutique issue. The Nov 2010 issue of Sew and Cut was the Jan 2010 issues of Mia Boutique, same pictures, same patterns, and same sizes.

60073 Ателье This is the Item number and the Russian name of the magazine. You can copy /paste either of them into the Search feature on the web site to pull up the order info. Subscription of 3 issues for $28.00


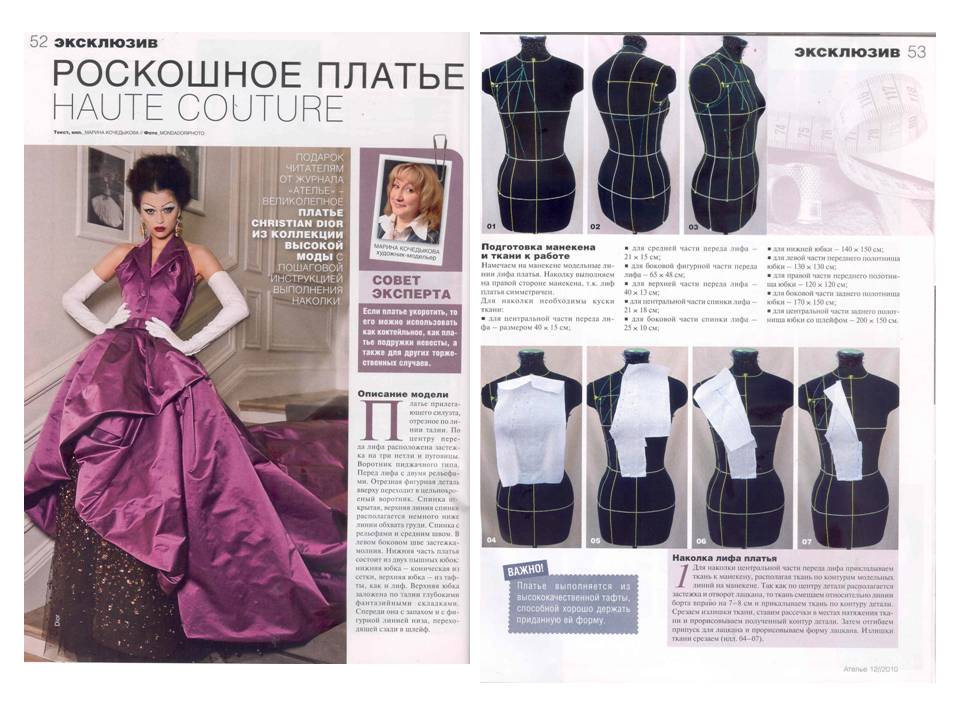
My Description - This magazine has articles on the latest trends in fashion, articles on drafting patterns using CAD software, and articles on couture level garment construction. There are also articles showing how to work from a fashion illustration or a picture of a garment and drape it on a dress form. I don’t believe there are typically patterns in the magazine, though the last issue had a number of dress patterns, each in one size only. In the Dec. issue there was an article on making the patterns for and sewing wonderful fur hats with shaped insets of contrasting fur.


And this article on draping this haute couture dress with pages of pictures of each step.


I wish there was an English language magazine with this same content.

Tuesday, January 11, 2011

Sewing Sensory Overload

Help, I am paralyzed by sewing sensory overload. I was nearing completion on two versions of this jacket from the Jan. issue of Burdastyle magazine when I received 5 sewing magazines and two vintage patterns all at once.
The magazines: Jan/Feb Threads which was a bit late, two issues of Stitches, the Jan issues of Studio and the Feb/Mar Vogue Patterns. So many ideas and new patterns, I can't focus.

The patterns for all these dress were in the Jan. issue of Studio, a Russian magazine about pattern drafting, designing and industry clothing construction. I want to make every one of them. They all have design details I have never sewn before.


Then the Vogue Pattern magazine arrived. This magazine has improved so much in the past year. More technique articles, and free patterns. They have even copied shamelessly from BurdaStyle. Vogue now has the line drawings of the garment on the photo page, and has the "styling one garment 4 ways" feature that Burda has. "Imitation is the sincerest form of flattery"

This issue has a lot of new patterns I want to buy, right now. Or at least put in my shopping cart on the Vogue pattern web site so the minute the BMV sale is announced, I can send in my order. Of course none of the new patterns are on the Vogue web site yet. It is so frustrating. Here are my favorites.

I love the ladylike sillouete and seaming on this dress.


And the neat released tuck detail at the neckline of this dress. This pattern is for knits. I am thinking of converting the dress to a top by cutting it off at the high hip.


This Donna Karan dress looks like they took one of the her knit crossover dress patterns and converted it for wovens. Interesting but a bit bulky looking.


I love this Donna Karan shirt dress, though I would make it in a lighter weight woven fabric than the one it is shown in.


This Pamela Roland dress is an update of the sleek lines and A line silhouette of my favorite 60's dresses.


I have the perfect silk print fabric for this Vena Cava dress, but I don't think I can carry off a shapeless silhouette like this one. I don't have the shoulders for it.


And my absolute favorite - the jacket in this wardrobe pattern. Interesting sleeves and seaming, open neckline, and pleated peplum. The perfect casual summer jacket.


Anybody have any suggestions how I can calm myself down and prioritize my next sewing projects?