
The jacket pictured on the front cover of the Oct Burda Style magazine is from Karl Lagerfeld's Spring 2010 collection. I didn't really care for it at first glance. The jacket looked bulky and stiff. It stuck out in odd places, and was not attractive on the model. But some of the styling details were unique and interesting. The extended front that is folded up and sewn to the side seam and arm hole, and the sleeve top that overlaps the jacket shoulder and are held in place with a button and in-seam buttonholes.
I kept studying the line drawing and the picture of the jacket Style.com

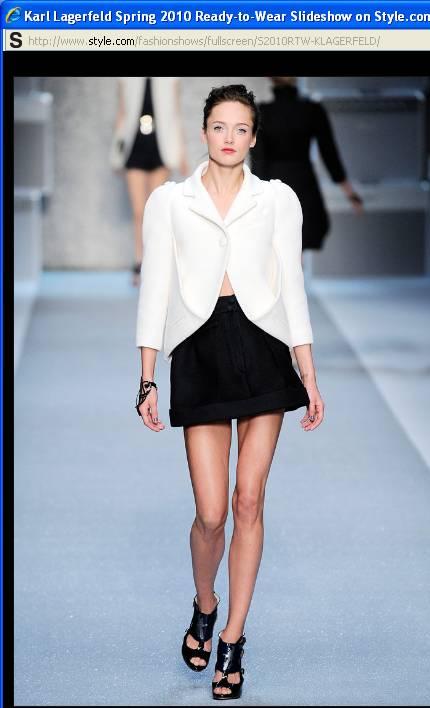 In those the jacket hung straight from the shoulders and skimmed the hips. It reminded me in some ways of the boxy jackets of the 60’s which often had high lapels and ¾ length sleeves. It looked like it could be wearable so I decided to make it.
The suggested fabric was ottoman. Ottoman describes a weave that has horizontal ridges. The ridges can make the fabric stiff. I did not see that the ottoman weave added anything to the jacket. So I chose a medium weight green wool flannel with a plush finish. When choosing a fabric for this jacket, it is helpful to know that there will be four layers of fabric in the side seams, the back, front and the two layers of the extended front. And in the side hem area, two more layers. A lot of fabric.
The welt pockets on the turn back piece are about an inch deep, not big enough to hold anything worthwhile. I made the welts, but they are decorative. They are sewn shut and there is no pocket bag behind them. There were no recommendations for interfacing the back. I felt it needed more structure in the shoulder areas to balance the heavier front. I added interfacing to the upper back and extended it around the arm holes. I also used wigan on the back and sleeve hems to maintain shape. I had to make my own wigan for the back hem as it is 6 inches deep. I used purchased buttons rather than covering buttons to match the jacket as Burda did. The fitting changes that I made for my body differences; I added a back shoulder dart and eased it in to the front shoulder seam. And I added an inch or so in the hip area so that the jacket hung straight down over my hips. The instructions specifically tell you not to press the hem of the jacket. I was not sure if that was just for that step of construction or in the final garment. In the Style.com photo, the bottom edge of the jacket was very crisp. I pressed the bottom of the turn back, and in addition tacked it to the front about 2 inches from the armhole and at the welt pocket. The sleeves are really cool. Here is what they look like before they are sewn into the armhole. I tried to poke my fingers through the inseam button holes so you could see where they are located on either side of the pointed top.

This is what they look like after being sewn into the armhole and folded up over the button on the shoulder.

The jacket fits fine, but it is a bit big and boxy. The shoulders are wide. I think I may need go with bigger raglan shoulder pads as the sleeves are collapsing a bit at the shoulder. It is more like a short coat than a jacket one would wear all day in the office. The skirt shown with the jacket in the magazine doesn’t fit my lifestyle. I am a little puzzled as to what to wear with this jacket. I am wearing it with a long skirt in these pictures, but I think a knee length tapered pencil shirt, or tapered pants would look better.

This pattern, and instructions, are available as a download from Burda Style.
When I went out on Style.com to get a picture of the jacket, I was surprised to see that Karl used turned back sections in numerous garments in his Spring and Fall 2010 ready to wear collections. These are two of my favorites. 
Now that I have made the Burda jacket, I feel I might be able to make pattens for a similar jacket and dress on my own. The invitations to the holiday parties are starting to come in. And one specified "Dress to the nines!" Wouldn’t the black dress with the lace be fun to wear?


