Tuesday, January 31, 2012

Burda Color Block

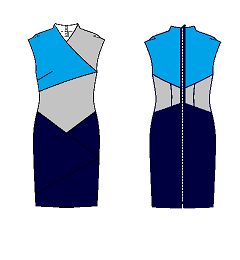
So one Saturday not long ago, I was happily sewing a Roland Mouret inspired dress. My DH yells “Mail is here!” I take a break to see if any of the vintage patterns I ordered had arrived. No patterns, but the BurdaStyle Feb. issue was there, a week earlier than normal. Since I am on a sewing break, I decide to look at the magazine. I see the color block version of dress and my SAD (Sewing Attention Deficit) kicks in.
Burda Feb 2012 #117

Roland was pushed to the side and I immediately started the process of tracing the pattern. Of course it helped that the gray and navy ponte knits I was using for the Roland dress could also be used for the Burda dress. The magazine show 4 colors used for the color blocking.  I consider using bright blue and aqua as colors 3 and 4.
4 color combination
3 color combination
but decided to use a 3 color combo.
Alternate 3 color combination
I wished I had some orange ponte knit. I really like the orange, gray, and navy color block combo.

BurdaStyle magazine pattern tracing is not my favorite activity, and tracing this pattern seemed to take longer than usual. The factors that caused this were the pattern lines being printed in red, there were lots of them, and they were irregular shapes. Red lines are hard to see through my tracing paper, especially when they cross the solid red patterns also printed on the same sheet. I also tend to look for familiar shaped pattern pieces rather than use the numbers printed along the sheet border to locate the pieces. I couldn’t get away with that on this pattern.

There is a lot of shaping in the seams of this dress. The visible bust dart is balanced by a dart incorporated in the seam on the opposite side. Waist shaping is also done in the V seam at the bottom of the front waist sections. The center back seam curves in at the waist, out over the butt and back in underneath it. Great for callipygians - those who have shapely buttocks (my dad taught me that word along time ago and I still enjoy saying it) But since I am not one, that seam got straighten from waist to hem.

Shaping in seams

I recommend tracing and adding seam allowances accurately so you don’t lose all this subtle shaping. Some of the odd shaped pattern pieces are cut out once and care had to be taken to ensure they are cut oriented correctly on the right side of the fabric. I almost ended up with a reverse image dress because I was not paying attention during the cutting out. To make assembly go faster, I laid the cut pieces out on a flat surface as they would be placed in the finished dress. There are illustrated instructions for this dress in the pattern supplement, which is helpful.

I did not install a working zipper in the back as the pattern instructions suggest. I sewed the front overlap partially shut leaving just enough room for me to pull the dress over my head. I sewed invisible, iron resistant, nylon snaps to hold the front closed after the dress was on.

Snaps
I liked the exposed zipper down the back as shown in the magazine, but for the length of my dress it had to be 41 inches, with an open bottom and either blue or gray. Not available in my local fabric stores! I special ordered a zipper from www.zippersource.com  It took two weeks to arrive. Much longer than any previous custom orders, and it is what delayed this post about the dress. I used a 1.25 wide satin ribbon to stabilize the center back seam and prevent it from stretching from the weight of the zipper. I chose a wide ribbon so it would be under the whole width of the zipper. I hand basted the ribbon over the center back seam on the inside of the dress.
back seam stabilized with ribbon

I then hand basted the zipper over the center back seam on the outside of the dress. And lastly, sewed the zipper in place with four lines of stitching. One along the outer edge of the zipper tape and one against the teeth, on both sides of the zipper.

Zipper basted in place

  I like the dress a lot. The colors make me happy. The bright blue pendant shape on top draws the eyes away for lower, wider parts. It is very comfortable. Now to get back to the neglected Roland dress.


Saturday, January 21, 2012

Catching Up

Well, work has been every bit as stressful as I thought it would be when I was told I was taking over the responsibilities of my coworker, in addition to the ones I already had. “Drinking from a fire hose” is an apt description of how I felt the first two weeks. So much information, as well as phone calls and emails about problems, coming at me non stop. My new responsibilities now include the day to day support of applications that track the hourly workforce work time and attendance.  We have multiple unions, each with their own convoluted and complicated pay rules. The union contract pay rules must be reflected correctly in the application or paychecks are incorrect. People get very upset over incorrect paychecks. Imagine that! This week I am finally starting to feel I will eventually have a good knowledge of the applications and be able to fix my clients’ problems quickly and efficiently, which is a huge factor in my job satisfaction.

Sewing is my de-stressor. Blogging about sewing is low priority, which means I have some catching up to do.

I finished up the last two pieces of my 6 PAK wardrobe plus two extra ones. Here is the story board for this mini wardrobe.

Misty Morning 6 PAC Story Board

Kwik Sew 3915 a close fitting pull over top with full length sleeves and V-neckline with lapped collar that is gathered at front neckline with four decorative buttons and loops.
I made it out of a print rayon Lycra knit.

Kwik Sew 3915
 Actually I used a TNT T-shirt pattern and added the Kwik Sew collar to it. Why? Well the Kwik Sew sizing is S,M and L. To fit the measurements in each of those size ranges, the sleeve pattern back and front armhole curve is the same length, with a short cap height which results in a wider sleeve. I need a more shaped sleeve cap with back armhole length longer than the front. Also I prefer a narrower, close fitting sleeve in a knit top, which the higher sleeve cap creates.


My TNT knit top pattern is an older New Look pattern.
New Look 6779


The second pair of pants is Silhouette Yoga Pant pattern made in a gray heavy weigh poly/rayon/lycra ponte knit.


At the sewing expo, Peggy Sagers, the designer of Silhouette patterns, was wearing a pair of these pants and they looked very polished and comfortable. Not at all like she was on her way to yoga class. The pant pattern includes a fabric covered, 2 inch wide elastic waist band and seaming down the front and back legs. By the way, the line drawing of the pant front on the website is incorrect. It looks like this. Hint: seams on front leg.


When I emailed to ask if the pattern had been changed, Peggy replied "Thanks for bringing that to my attention...we had put the pattern back envelope up on the website and before printing noticed the error and clearly, did not go back and fix...we will do...so thanks, we will get it fixed...the back of the pattern is correct in the printing, but not on the website...thanks again...Peggy"


The extra garments were both made with Silhouette patterns. Peggy got a lot of my money at the sewing expo. A raglan sleeve knit top pattern with shirred sleeves and princess seams, made of a light weight, opaque, dark gray poly Lycra knit.
Silhouette Pattern #110
I liked the shirring and the princess seaming, which is only in the larger women's sizes, not the kid sizes which are also included in the pattern. I did have to add some width at the hips area as the pattern seemed to be drafted for a body whose hips were smaller than bust.


Silhouette Pattern 110

And a very loose-fitting, pullover top with one-piece twist front (wrong side shows)


Silhouette Pattern 95
The fabric is a rayon gauze, very drapey with an open weave. This top was quick to make. Hemming the edges of the front and back pieces took the longest time. I used a rolled hem, but in hindsight, a serged edge would have looked just as good and made the task quicker. I have always admired the bohemian look of this type of garment when it is worn by others, but it is way out of my comfort zone of tailored, fitted tops. Still, I will try anything once. I like it, but it is so drapey it gets in the way when I am working with my hands and it catches on things. It has been consigned to my “wear to a stand around and look good” wardrobe for a party, lecture, or art show.

All of the Silhouette Patterns are available at this website. Silhouette patterns.

Here is some pictures of the new garments worn in combination with the older ones.

Friday, December 30, 2011

On the Border

Wow, I was really surprised how many of you had gone through similar job layoffs. Your comments really helped me shake my bad mood.
The holiday guests have gone on to Fla. We live a short distance from I95, the main north/south road on the east coast, a good stopping point between Fla and northern locations. Hubby and oldest son are out shopping for a used car with good gas mileage and storage capacity for a duffel bag full of ice hockey gear and sticks. Yep, they took the bag on the test drives. I pity the poor salesman. The smell of a bag of used (sweaty) hockey pads is indescribable. No amount of soaking the pads in a tub full of bleach solution can erase it. Phew! The reason for the new car is that as of Jan 1, younger son is a legal driver. He will inherit the “loser cruiser” an old, mud colored, no horsepower, mini van. And older brother gets a “new” car in preparation of going off to college in the near future.

As for sewing, I have been working on the final pieces for my 6 PAC wardrobe. The one inspired by my misty morning drive to work.

I order this double georgette silk fabric to make a blouse.
and got this


A border print! Not along one selvage edge, but every 26 " in the print. This is the 2nd time DenverFabrics has surprised me by sending me a border print when I thought I was getting an allover print. There was no mention of this in the product description and the border was not shown in the online picture. This annoyed me greatly because I had ordered a specific quantity assuming an all over pattern. And they always ignore the border placement when they cut the length specified. So each cut end was a different distance from the border. Grr. When life deals you border prints, you’ve got to get creative. I found the Purrfections 1039 modern poet blouse pattern in my collection and thought the border print could be used for the cuffs and cross over band.


Oh and the border was not printed on the cross grain. It was about ½ inch off at one end. Better to have the fabric of an interfaced band cut slightly off grain, than to incorporate the border on the bottom of a garment piece and have to cut the piece out slightly askew for the border to be straight.  After reading the patternreview.com reviews of the Purrfection pattern, I felt it would require too many alterations in the back, sleeve and shoulders for me. Those are my problem areas. I still loved the style though. I looked through old Burda Style magazines for a similar shoulder princess seam blouse pattern that I could modify to look like the Purrfections blouse. I found the perfect one in Jan 2008 blouse 105/106.
I overlaid the Purrfection center front  pattern over the Burda center front pattern and traced the deep V neck line with a 2" overlap at center front.

The  neckline is on the bias. To make sure this edge did not stretch during sewing, I did several things.
1. I used light weight fusible interfacing on the facing.
2. I made sure to cut the interfacing using the pattern piece (accurate) rather than the garment pieces or the pattern piece with the garment fabric still attached (inaccurate) and yes, I am guilty of doing this.
 3. I used fusible straight grain iron-on stabilizing tape on the neck line of the garment front pieces. I pinned the fabric to the pattern, wrong side up, to ensure it was the exact shape of the pattern. Then I applied the fusible tape over the seam line.


Since the neck band I wanted to use was much wider than the one on the pattern, I moved the neck/ band seam outward towards the shoulder seam, otherwise the band would have been covering my ears. I added some thin flexible trim at the band seam to accent the V neck.


I will post pictures of the blouse on me when I finish the new pair of pants I am working on now.

Does my blouse match your kitchen? DH and I remember the color scheme and pattern of the border as being very popular in the tile selection at the Do-It-Yourself stores a couple of years ago.

Friday, December 23, 2011

Bits and Pieces

I usually love to sew dresses for year end parties. This year I just wasn't into it.

My employer announced another salaried employee reduction in late Nov., with notification to be made on Dec 15. Horrible timing. I didn’t RSVP to 2 company related holiday parties until after the Dec 15th date for obvious reasons. I still have a job. Several of my coworker/friends do not. This is the 3rd reduction  in as many years; declining market, etc. The last two cut out the poor performers and none value added skills. This one was much harder to go through. The selection criterion was not publicized, or even explained to the people that were terminated. Less than 4 years and I am out the door with  full retirement benefits. I hope I can hang on that long with my increased workload.

Rather than sew something new, I refurbished my little black dress from last year. I like this dress a lot. It is fitted and has a bra friendly V back which shows off the results of those P90X back and shoulder workouts. I blogged about the dress here.  Dec 2011 I removed the silver and black faux jewels and replaced them with a black braided trim with gold balls.

Over it I wore the faux fur jacket that I made last year.

I attended a couple of classes at G Street Fabric's several weeks ago. Beginners Guide to Sewing Silks and Sewing with Sheer Fabrics. Both were very informative and the instructor had a wonderful trunk show of garments she had made. There was one top that I really liked. It was made in a sheer fabric  with narrow french seams that accented the unique style lines. All the instructor could remember was that the top was made from a discontinued Vogue pattern. The sketch is below. It may not be completely accurate because it is from memory. The top had kimono sleeves. The  lower back wrapped around to the front, and there are geometric pieces sewn on the bottom. Do any of you recognize the style lines/pattern?

What Pattern is this?
Well, I am off to paint the bathroom that will be used by the guests who are arriving on Christmas Day.  I wish I was motivated to keep my home in guest ready condition, but I know when  it comes down to a choice of what to do in my spare time, sewing wins over painting any day.

Wishing everyone a happy holiday season!

Sunday, December 4, 2011

Troublesome Trio

My week off and the Thanksgiving holiday was lovely. DS hosted the holiday dinner so the parents would not have to travel far. Here is her gorgeous table before the meal started
and after.


I was taking the pictures. When I had put the camera away and filled my plate, I found that DS the eldest (19) had promoted himself to the adult table and the only empty seat was at, you guessed it, the kid table. So I ate with my nieces and nephews, ages 6-17, and had a great time.

On the sewing side of life, I am working on a 6 piece wardrobe, part of a 6PAC sew along at Stitcher’s Guild 6PAC The goal is to sew a 6 piece wardrobe in 3 months.

The color scheme for my mini wardrobe was inspired by the colors I saw, for what seemed like weeks, on my morning drive to work. Gray skies or fog. Ribbons of concrete top stitched with lanes lines of dull gold and white. A leafy border of fading gold and rust above the ribbed cement noise barriers lining the side of the road. My drive home from work is in the dark.

The colors: greige (gray +beige), brown, gold, white, rust. The textures: smooth, ribbed or leafy. Techniques: top stitching, pin tucking, gathers

I have completed the first three garments. Each of them had an issue/challenge.

The knit top is Burda 1-2011 – 129.


I used a small piece of poly lycra animal print fabric. With a careful layout, ¾ sleeves and 3/8 seams, I was able to get all the pattern pieces cut out. I sewed the bodice using a straight stitch, something I do for fitting purposes on knits because I hate to rip out serging. It was too big, gigunda. I would have expected this top pattern to have been drafted with negative ease. But for the size 42 ( bust 36.25 inches) the pattern bust measurement was 38.5. I removed 4 inches of ease to get this top to fit snugly. Some of this may have been because my fabric was softer and stretchier than the jersey fabric used by Burda. On the back piece, which has the front armhole and shoulder cut on, I did it by creating a center back seam.  On the  front I cut the excess fabric off the sides.


The pants were a challenge because of operator (me) error tracing the pattern.
Where was my mind that day? I didn’t trace the front zipper area extension or the pocket extension. The pants pieces on the pattern sheet overlapped and  I inadvertently traced the grain line for the front pant piece on the back pattern piece and vise versa. It wasn’t until I was laying out the pattern pieces on the fabric that it occurred to me something might be wrong. The pant leg bottoms were not on the cross grain.

I discovered, after 20 years of using Burda patterns, that the grain line indicator on any pattern piece starts at the top edge. I caught the grain line and the front extension error before cutting the fabric. But not the pocket extension. I didn’t notice that until I was sewing the pocket to the pocket lining and they did not match up. The save was easy, but not satisfying. The side seam can be seen in the pocket opening. The fabric is a milk chocolate brown wool gabardine. I do like the style of these pants, especially the close fit in the upper leg with the gentle flare at the hem. This is not mentioned in the copy or obvious from the line drawing.

Finally the jacket – a Sandra Betzina Vogue pattern 1036 with lots of pattern pieces and top stitching.
I chose a cement colored polyester suede fabric. It was the perfect color and texture, but what was I thinking? I must have taken out the top stitching on every seam at least once because of wavering stitches and tension problems. My machine does great top stitching in the center needle position. But when I try to use an edge foot and a needle left or right position, the thread tension goes out the window. I actually have to tighten the tension of the  heavier top thread to fix the problem. And how the heck do you press this type of fabric flat? Heat, steam, both? Too much heat and it melts. Ask me how I know. I broke down and actually used a press cloth to prevent imprinting the suede texture with the iron. But the press cloth  I used was muslin and I couldn’t see what I was doing. It was very frustrating. I was complaining about this to my sewing friends over lunch, after a guild meeting, and one mentioned this Threads magazine article "Make a Press-Cloth Wardrobe," Threads #154, p. 44 Guide to Press Cloths about having a variety of pressing cloths, including one of silk organza which is slightly transparent. The silk organza worked great, but I still had to hand baste edges to hold them  in place for top stitching.  Any "how to press" suggestions are appreciated as I would like to make Vogue 1268, the Guy Laroche shirt dress, out of similar fabric. And to add more rework; I cut the lining for the jacket out of some heavier taffeta like material from my stash. It was too stiff and changed the hand of the suede. So I ripped it out and cut another lining out of Bemberg.
This jacket took forever. If I don’t look too closely at the top stitching, I actually like it a lot.


Right now I am trying to decide whether to make a few new holiday party outfits or wear ones I already have. Making new ones is definitely winning.