Sunday, October 23, 2011

Sewing from a Suitcase

Yes, that is what I did last week while at of out of town, work related training course. The class location was a drivable distance, so I took along my sewing machine and packed sewing projects in my suitcase. A blouse, with the pattern pieces cut out, the interfacing, buttons, and threads. Pants, cut out, with thread and zipper. I forgot the interfacing for the pants waistband, a different type of interfacing than for the blouse, so I didn’t get as far on them as I had planned. I did finish the blouse.


I wanted to make a blouse to go with the pants in my last post. BurdaStyle and the retail web sites are showing a lot of flowy, lightweight blouses with pants for fall.  I really liked the bouse on the right in the Fall 2011 Lutterloh fashion supplement (pamphlet of patterns).


 But as I am still a Lutterloh pattern neophyte and not familiar with the fit and built in ease of these patterns. I decided to use a pattern brand I was more comfortable with.  This BurdaStyle blouse, from the 9/2010 issue, pattern 102 is almost an exact replica of the Lutterloh blouse including the stand collar, though it is hidden behind stiff, bias cut, double thickness, gathered ruffles.


I drafted my own pattern for the small cascading ruffle that was sewn on the one side of the button placket on the Lutterloh blouse.

Drafting the ruffle:


1. Determine the length and width of the ruffle strip. Length was the distance from the neck seam to the waist. Width was about 1.5 “(no seam allowances included at this time) Cut a rectangle of pattern paper to this size. Label the neck, center front on the pattern piece.

2. Cut slashes from the outer edge to the center front edge, at even increments, leaving a hinge of paper on the center front edge.

3. Open up each slash the same amount to form a curve. The number, location, and open area  of the slashed determine how the ruffle looks and hangs. Fewer slashes, fewer and bigger waves. More slashes, more gentle waves.

4. Trace new ruffle shape onto a new piece of pattern paper, smoothing out the curves. Round off the outside corner bottom edge. Label center front edge and neck on pattern.

5. Cut out ruffle, adding seam allowances to neck and center front edges, and hem allowance to long curved edge.

6. Finish curved edge by desired method.

I did the narrow hem on the edge of the ruffle by hand, while watching Project Runway. Twice, because I turned the hem to the wrong side the first time I did it, distracted by the TV. That helped me empathize with the frustration some of the designers had executing their designs that night, and I got extra practice on narrow hemming.

The fabric is a silk chiffon remnant purchased at the Vogue Fabrics sewing expo booth. I was determined to use silk chiffon for this blouse. It has the most divine lightness and drape, which cannot be duplicated in rayon or poly, IMHO. But silk chiffon is my sewing nemesis, especially keeping the fabric flat and on grain while cutting out the pattern.

This time I did two things that improved the process. I ripped the fabric into shorter lengths, corresponded to the length needed for the bodice pieces, so I had smaller pieces of fabric to square up. And I used a layer of paper under the silk in the pattern cutting out process. I have heard of  this before, but never tried it. I used newspaper because it was handy (I checked for ink rub off first). In hind sight I could have used tissue paper, which I buy at the dollar store for gift wrapping. I am a convert to using the paper! It is easy to pin the fabric to the edge of the paper to keep it on grain. And the cutting, oh my! The fabric does not shift or push up in front of the scissor because of the paper's stiffness. And my scissors cut the paper/fabric together much cleaner and easier than the  chiffon fabric by itself.

Other construction details - I used skin tone silk organza as the interfacing for the front band cuffs, yoke and collar. And French seams to neatly finish inside seams. The cuffs are standard rectangular shirt cuff. The pattern used is from the other, tie neck version, of this blouse in the same issue.
I am pleased with how this turned out. It looks nice with the pants and also worn with jeans as an over blouse. It can also be worn with gray pants and jackets I have in my wardrobe.


That is Ms. Ashley trying to get into the picture. Speaking of cats. I just found out about a book called Crafting with Cat Fur Yes, it is about using your cat's fur in crafting projects like felting. Ms. Ashley is a long haired cat and a prodigious spring time shedder. I have no desire to use her hair for crafts. But I thought some other members of my family, with a potentially large supply of that raw material, might be interested.

Tuesday, October 4, 2011

A Taste of Wine - Burda 8_2011 Pant 137

I seem to be spending my weekends gallivanting off to quilt shows and sewing expos. This results in lots of new ideas and purchases, but very little sewing activity. I did manage to add some color and a new pant silhouette to my fall wardrobe. The color, a wine bordering on magenta, the silhouette - slouchy tapered leg. The pattern is Burda pant 8_2011 137.

Burda pant  Aug 2011 #137

The pants have  a double pleat, one within another. A sewn inverted pleat covered by a larger pleat. I think I interpreted  the directions correctly. They look fine and the waistband fits so I am happy.
 I was concerned about looking like an ice cream cone in narrow leg pants so I did a comparison of the pattern leg width to some other pants in my closet. The pattern leg circumference is 15.5 inches. The narrowest leg pants in my closet were 14"  jeans so I felt comfortable making the pattern.   I did not include the side seam pockets. Most of my hip curve is between my waist and 4 inches below. Side seam pockets always gape on that short, extreme curve.

The fabric is a lightweight wool lycra gabardine from Vogue Fabrics. It is described as washable and came through that test beautifully. It has the soft drape needed for these pants. I did not line them. I looked on the  netaporter  web site  for purple pants and  styling ideas.


Diane von Furstenberg
 
Acne


YSL


I prefer pants like this hemmed long, covering the ankle, and worn with chunky high heel shoes.   But looking at the picture,  I think I need to shorten mine about an inch to keep the leg from pooling on the top of my foot. I haven't rotated my summer clothes out yet,  so in this picture I am working the color blocking trend and wearing the pants with a gold sleeveless RTW knit top and chunky sandals.    But the weather is cooling so I am in the process of  choosing a pattern, and fabric from the stash selection below, to make a coordinating blouse.


Just wanted to mention the wonderful 2 days I had at the Chantilly, VA Sewing  Expo. I took a lot of classes, mostly on fitting or sewing techniques. Even if a class is on a topic I am familiar with, it is good to have the refresher and see the demo’s again. This year Cynthia Guffey’s “Fitting your Hanger” ( shoulders and back) presentation really drove home the point that a lot of fitting issues in the bodice are because of poor shoulder and back fit. Before you start messing with bust and armholes, compare the shoulder slope of the pattern to your shoulder slope and make sure they match. Lorraine Henry’s "Crotchety Crotches" class discussed measuring and fitting armhole and leg crotches. I never thought of underarms as a crotch, but they are. She did an interesting comparison of her crotch shape  to that of  several pattern lines,  and a pattern copied from a RTW pair of Liz Claiborne pants. It was easy to see which pattern fit her best ( Liz). I want to do the same comparison exercise myself.  I bought several new pairs of specialty scissors, some independent patterns, fabric and lace. I love sewing expos and always come away invigorated and raring to go/sew.

Sunday, September 18, 2011

The Rest of the Wardrobe

Here are the other pieces of my summer sewn wardrobe.  They are all made using patterns that were very popular, with lots of positive reviews, and coverage on other blogs.

The skirt shown with most of the tops  is view C of Simplicity 2451. I use a size 14 for the back and a 16 for the front as that is how I am distributed below the waist. I lined it to reduce wrinkles.

This sleeveless top with contrast band is made from Simplicity 2892. I wanted to incorporate the tribal trend into the wardrobe so I used a rayon cotton print (Hancock Fabrics) with silk ruching and neck ruffle.


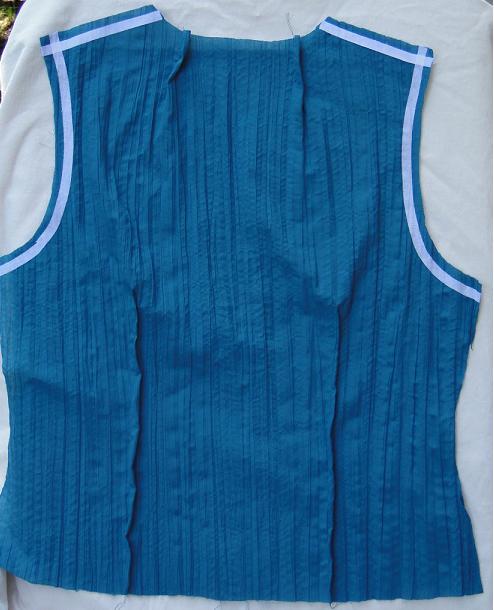
This sleeveless top in a teal crinkle poly/cotton voile ( Jo-Ann Fabrics) is sewn from Burda  07-2007 -119.  To keep the crinkles from stretching in the armhole and neck line area during construction, I use bias fusible stabilizing tape to hold them in place. Burda magazine instructions quite often recommend this type of tape and I find it very helpful. My original supply came from Judy Barlup but I found a cheaper source at.fabric.com fusible tape


I collect 1980’s Vogue blouse patterns because they were designed for woven fabrics,  unlike most of the top patterns nowadays, and they have interesting details. Patterns from that time were designed for shoulder pads and generally need to be modified if pads will not be worn. I made changes to the shoulder seam and sleeve hole opening to remove the space for the shoulder pads.

View A of Vogue 2504 was made in a variegated purple print silk (EOS). I love the print.  But this fabric is overprinted with tiny plastic squares, which made it a challenge to iron and give the fabric a shiny snakeskin look. I washed the fabric several time in really hot water hoping to eliminate or dull the coating. It didn’t work.

 Butterick 5185, a twist top with angled hem lines was made  in a non stretchy shadow print cotton knit . Thi stop was fast to make and easy to wear.

And lastly Simplicity 2554 view F - A sleeveless blouse with flounces sewn into front and back shoulder princess seams in a purple, clay pink and black silk print ( G Street Fabrics). I love the colors.  This is one of those multiple style top patterns where some are designed for knit and some for woven fabrics. Wovens are recommended for this top, but it has been made successfully in knits.


I have still not started my fall sewing. I have purchased a few fall fabrics, and am studying the Sept. fashion magazines from France, Britain, and Australia, which I buy at my local Barnes and Noble book store. Earlier this week I attended an Accessorizing Workshop given by a local image consultant. A small group of us met at Nordstrom’s for the initial lecture on “using fabulous accessories (shoes, belts, jewelry, sunglasses) to make an outfit spectacular” while considering body shape and hair and skin coloring. Then we trouped on down to  the Chico’s, Black Market/ White House and Ann Taylor stores where she showed us the on trend accessories at each store and used us as models to illustrate flattering style and proportion. Then it was back to Nordstrom’s where we had a homework exercise - “Pull together a flattering outfit, clothing and accessories, for yourself from any department in the store.” It was fun roaming about the store, selecting shoes from the shoe dept.  choosing jewelry, picking cool sunglasses from the teen dept. and why not …high end garments for my outfit. Yes, I did have to explain to the clerks what I was doing, but they were very helpful. It was not easy task for me. I think it was harder because of my sewing background. I kept thinking “If only they had a jacket in this fabric, but in a more flattering style,  or if I could just find a  pair of cropped pants in this particular color..." rather than accepting and working with what the store had to offer.  But I got an A on my homework assignment, and seeing the latest clothes and accessories gave me a lot of ideas.  And to my husband’s relief, I did not buy a thing.

Tuesday, September 6, 2011

Not Falling Yet

I am still sewing summer clothes because it is quite warm where I live, though the humidity has dropped, the light is softer and it is now dark when my 5:45 AM alarm goes off. Sigh, yes fall is on its way. Since June I have been sewing items for a summer wardrobe, part of a sew along our ASG sewing group is doing as a follow up for a presentation I gave on SWAPing. My wardrobe was  inspired from  these photos in my  idea files.


All of them feature dark gray bottom pieces. I wanted to take the easy approach for this wardrobe and make the bottoms out of the same fabric, charcoal gray cotton linen look( Hancock Fabrics). Then go to town with tops that coordinated. Just about every color can go with gray, which meant I could find coordinating fabrics in my stash. It was so hot when I was sewing many of the tops that they are either sleeveless or overblouses intended to be worn without a jackets.
Using  LIFO,  the latest top is made from OOP Simplicity 5555.

The fabric is a white linen with black pinstripes (JoAnn Fabrics). I ombre dyed the fabric ocean blue and then added black to the dye mix for the darkest color band, inspired by this Anthropologie dress.
.


Unfortunately this band cannot be seen because it is in the turned up hem. A lessoned learned for the next time I do this type of dying.

The pants are straight leg falling from the hip, faced waist with side invisible zipper made from my pants sloper.

Monday, August 22, 2011

Blouse Burda 7770

I made this blouse earlier this summer and have worn it quite a lot. When the weather is hot and humid,  I prefer a sleeveless over blouse. They tend not to show the rivulets of perspiration running down my body as readily as a  close fitting knit top.


Burda 7770 – princess seam blouse with  extended sleeve and an asymmetrical opening. This  Burda pattern has been around since 2007, so I was really surprised that there wasn’t already a review in blog land.  Burda envelope patterns are printed with seam allowances, and finished garment measurement for hip and bust on printed on the pattern pieces just like the big 4. The only thing I don’t like about the Burda envelope patterns is that the cutting layouts are printed on the pattern tissue, not on the instruction sheets. I often want to see the layout before I open up the pattern tissue. And from years of using big 4 pattern brands,  I am programmed to rough cut around the pattern pieces and throw away the pattern tissue scraps.

The fabric I used for this blouse is a cotton print remnant purchased at JoAnn Fabrics. The colors and floral motifs of the print reminds me of a piece of fabric my mother had in the early 70’s. The blouse on the pattern envelope front looks a bit small in the bust on the model. I checked the finished garment measurement of the bust printed on the pattern pieces and there was a 2 inch difference between it and mine (wearing ease). I thought that would be enough, but when I tried on the completed blouse it was tight in the bust area and I am not a busty gal. I reduced the seam allowance in the princess seam to 3/8 inch over the bust to give me a bit more room.
The asymmetrical front opening is faced, Easy peasy sewing.The only issue I had was, because I was using a remnant that was less than the recommended yardage, I had a difficult time finding a piece of the fabric with the right shape and size for the asymmetrical facing. Don’t tell, but it is slightly off grain. The blouse required 7 buttons and I had 8. I sewed the extra button to the inside side seam allowance, as is done on RTW men’s shirts, so it would be handy if I lost a button.


There is a very similar blouse in the Burda Style magazine 06-2007 issue, # 112 and 113, with the same asymmetrical front band/closure. However the magazine blouse has darts instead of princess seams, and either cap sleeves or long sleeves  instead of extended sleeves. The long sleeve version is featured in the detailed sewing course section. The magazine pattern would probably be easier to sew/alter and  give the same look.
I wear the blouse with several different bottoms; white RTW jeans, and culottes and capris which I made. More on the latter garments in the next post. This is a picture of me wearing the blouse  while giving a presentation at an ASG meeting. The  presentation topic was planning a SWAP (Sewing with a Plan) around a garment already in your wardrobe .


Tuesday, August 9, 2011

Back from Vacation

I just returned from a wonderful vacation at the Delaware shore.
My vacation attitude was best summarized by this line from the Jimmy Buffett, Zak Brown song, Knee Deep,  ”only worry in the world, is the tide going to reach my chair” My beach chair was parked at the high tide line so I could keep an eye these two "sea urchins".
They had to be forced to take a breaks from playing in the waves and digging holes in the sand. I wish I had their energy. We were dreading a beach vacation in the hot humid weather the east coast is experiencing, but it was tempered by cool ocean breezes and we could actually were able to sit comfortably on the porch of the beach house in the evening. We returned home to a crunchy brown lawn and parched looking perennials. My fig trees are the only plants in the yard thriving in the hot weather and they will have a bumper crop, if I can just keep them watered until the fruit ripens.

Sewing related activities during the vacation included a trip to all the quilt shops in the area with DS, BFF and SIL, who are all quilters. My DS has a AccuQuilt,
a fabric cutting machine that uses dies to quickly and accurately cut the strips, triangles and other shapes used in quilts.  On the one rainy day of the week, we sent the guys off to the local nail salon to get pedicures and we used the Accuquilt to production cut quilt shapes. I have saved my good silk work blouses for years with the idea of making a quilts from them to “document” the fabrics and colors worn during my career 1979-20??. This is only a small sample of my old blouses.
Originally quilts were made from clothing scraps, and historians learned a lot about the fabrics and dyes of those times from studying the quilts. But nowadays, quilt shops have fabrics designed specifically for quilting, complete with  marketing and advertising campaigns, classes, and glossy books to encourage sales. I am a bit saddened by this trend. These fabrics are not anything like the natural fiber fabrics used currently for clothing.  I cut apart my blouses, preserving the large sleeve, front, and back pieces. So while SIL and BFF were cutting up the latest quilt fabrics, I was cutting triangles and strips from silk broadcloth and shirting. I recently read a post by Lauriana of petitmainsauvage  She buys circa 1980's silk blouses like mine from thrift stores and repurposes them. I thought “Honey, I wore those blouses, you ought to see my collection!" But she is right about the blouses being made of wonderful fabrics, and lots of it because of the blocky styles.

On my inspiration board for fall are these wonderful garments that combine traditional tailoring and knitting. I just love them.
They are from the Winter 2010 collection of VAWK, a Canadian based design team that includes Sunny Fong – winner of Project Runway Canada’s Season 2. The knitting is the work of 24 year old Jacqueline Schiller, who was discovered behind the counter of a yarn shop and commissioned to do the knitting side of things two weeks before the show.
The knitted pieces appear to be attached to some of the garments with needle felting. I wonder if I can justify the purchase of a needle felting machine for this project.

I have a coworker who is a fantastic knitter. She looked at my sketches and the pictures and suggested the yarn type and weight that would achieve the look I was after. Part of my confidence in pursuing this project is the knowing what a great resource she is. I found the perfect yarn, a wool thick and thin bulky roving, that matched my wool fabric, while on vacation.  I practiced my knitting during after dinner chats on the porch. I need the practice. The last time I knitted a garment, I was in high school.

The article Knit One, Sew Too by Susan Lazear, which appeared in the Fall 2007 issue of Notions ( a publication of the American Sewing Guild) is a great source of information and inspiration on using a sewing pattern and incorporating knitting in the finished garment. I may use some of Susan's ideas with some of the sweater knits I bought in recent years from EOS and Denverfabrics, and thought there might be others of you with similar fabrics aging in your stashes.