Tuesday, July 12, 2011

Vintage Patterns - Resizing using a sloper - Part 2


I fully intended to post part 2 of the pattern resizing shortly after part 1, but I had to put it aside when I realized I had volunteered to present the program at the July sewing guild meeting, and hadn't done any preparation. I did the presentation, which was on Sewing with a Plan (SWAP). So here we go on the Vogue 380 blouse front pattern resizing. Many of the steps are the same as those used on the back pattern piece, but the front has some decorative tucks, located on a center front seam above the bust, that impacted the pattern changes.

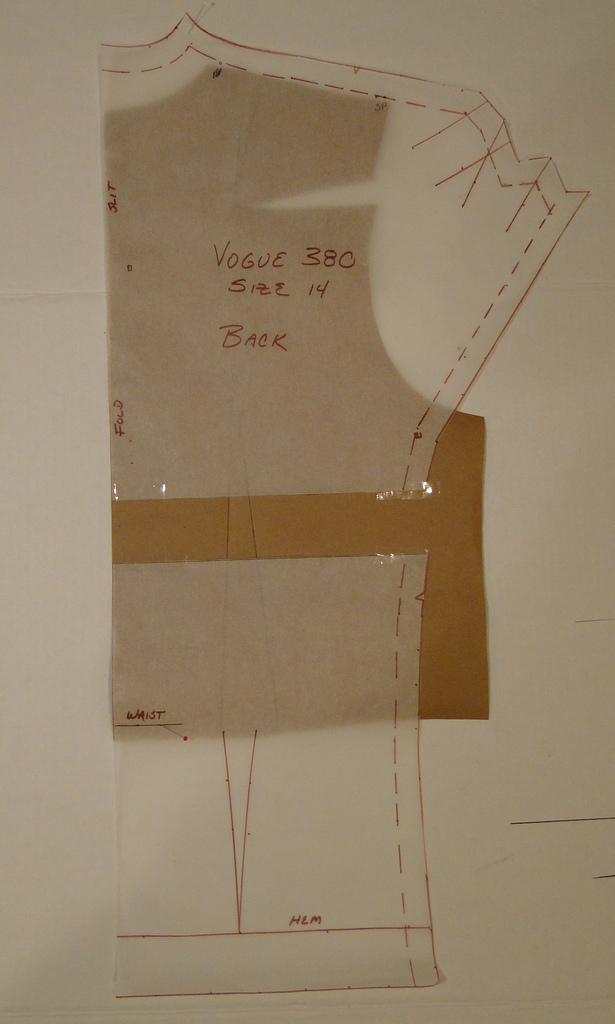
Here is the original blouse front pattern piece


And here is the copy of the front pattern with all the markings


which I will compare to my sloper. I rotated part of the waist dart on my sloper front to the side like the blouse pattern.


1. Pattern Sloper Comparison - Front

Align the center front of the pattern with the center front of the sloper
Align the waistline seam of the pattern with the waistline seam of the sloper


The center front tucks don’t appear to contribute to bust shaping. But unfolded, they make it hard to line up the center front and check the fit in the neck area. So I form the tucks and smooth the pattern so it is flat and the center front seam is straight. Now I can match up the center front easily. I was surprised to see that the tucks reallly pull the fabric in the shoulder area down and affects the fit in that area. So I will do all the pattern changes with the tucks folded.


2. Vertical Adjustments

The front is too short. The neck point of the pattern is below the neck point of the sloper about 5/8 inch. I will be adding less length in the front than I did it the back. This is normal for me. The underarm point of the pattern is way below the underarm of my sloper so I add the length below the arm hole opening, slashing from side seam to neck point in an "L" shape. This lets me to raise the shoulder, raise the underarm point and rotate the shoulder seam up the 1/2 inch needed for the shoulder pad in one operation.

3. Horizontal Adjustments

Shoulder

I also notice that the neck point, where the close fitting raised neckline should start to go up the side of the neck, needs to be moved closer to my neck opening. To get the correct shape of the raised neckline I put a small piece of tissue paper over the pattern and redraw the raised neck so it starts at my shoulder point.


Width at Bust- no changes.

Width at Waist - I compare the sloper dart width to pattern tuck take up. I need some extra width in the waist and I add it at the side seam. I change the location of tucks to the center of the new waist width

Width at Hip - I add additional width to the pattern to equal ¼ of my hip measurement .

Here is what the final pattern looks like with the front tucks opened up again. The tucks really do pull the shoulder area down when they are formed.


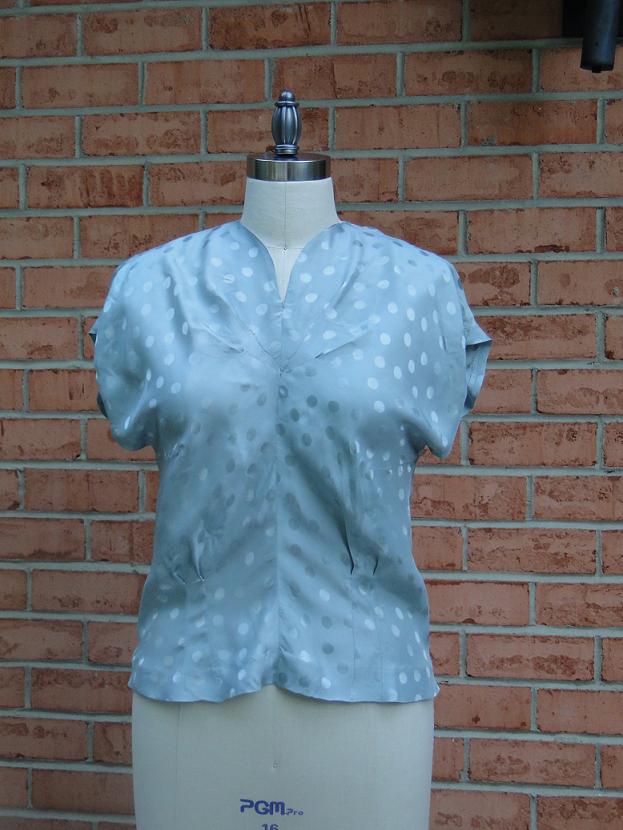
I checked the lengths of the side seams and shoulder seams to make sure they are the same on both the front and back. I drafted the front facing using the new shape of the neck area. I added a center back seam for fitting and easy sewing of the top back opening. I did not put a zipper in the side seam as suggested by the pattern. The fabric I used for this blouse was a rayon polka dot jacquard in a gray green color sometimes referred to a sea mist. I thought rayon was appropriate because it was available and used for clothing in the 1940’s. Back then it was called the “new silk”. Though my mother remembers the rayon from that time as cheap, flimsy fabric that did not hold up well. The tucks in the sleeve and the front are sunburst tucks, so named because they start at the same point and radiate out. The front seam is on the bias, so to get the tucks to match took a bunch of fiddling and hand basting. I sewed the tucks along the fold lines to hold them in place. The fabric was so soft, they drooped and looked sloppy without the stitching.


The blouse fits well and looks very much like the drawing which was very satisfying for a first resizing effort.


Next post will be on the resizing of the skirt. And then back to showing you current fashions, the summer clothes I sewed for my SWAP presentation.

Sunday, July 3, 2011

Answers to Bra Questions.

I wanted to answer some of the Bra related question I received on my last post just in case other readers are interested in the answers.


Lynneb has left a new comment on your post "Bravo":

It's a fascinating concept to me...making my own bras. Thank you again for such a detailed and informative post. I wonder...how do you feel about the seam across the center of the cup? And is there such a thing as making a seamless cup?

I wasn't thrilled about the seam across the cup because I usually wear molded cup bras, The seam did enable me to get a cup that matched my shape exactly. I sometimes have trouble filling up all parts of a molded foam cup. I won't wear the bras I made under T shirts because the seam does shows through. I think you could cover a molded pad with stretch material and then sew it to the band just like we did for the cup on this pattern. I have been reading Melissa's blog where she is talking about making a smooth cup bra Fehrtrade She hasn't discussed covering the pads yet, which is what I am really interested in.
Bra Makers Supply has foam cups for sale and super stretchy fabric they say is to cover foam cups. I looked for instructions on their site, but couldn't find any. They might be in one of the bra making books they sell.

If you find any info on making bras with molded cups, let me know. I am very interested.


dd has left a new comment on your post "Bravo":

Those bras look great! I love the swimsuit pattern. Can it be purchased online? I hope to be able to take a bra making class when the sew n expo comes here.

The bathing suit pattern was purchased from Etsy seller Merckwaerdigh She is based in the Netherlands. Her pattern prices are equivalent to the big 4 non sale prices and shipping is a bit higher, but her bathing suit styles were different than any I had seen before, and my order arrived within a week.
Sign up for the Bra classes at the expo as soon as registration opens. From what I hear, they fill up quickly.


Myrna commented.
Great write-up. I took a bra sewing workshop a few years ago and loved it. I've sewn Elan 645 numerous times. It's a great pattern. Thanks for showing the strap. We weren't taught that way in my class. Our straps are elastic. I'd like to try that. How are they stitched? How long is the bit of elastic? Thanks.

Here is the quick and dirty description to make the non stretch strap. Cut a piece of the fabric 3 times the width of the finished strap desired and about 16 inches long. Apply "tailoring" weight nonwoven, iron on interfacing to the wrong side of the strap pieces. Fold strap pieces in thirds to the finished width and zig zag, or other similar type decorative stitch, on both long sides of the strap pieces, very close to the edge. We used tricot fabric for our straps in class and I used poly/lycra for one of my bras. With the interfacing applied, the fabric is no longer stretchy. There are variations in Anne's book for a similar straps with padding or padding just at the shoulders. The piece of elastic is 3" long. After attaching to the band with a 1/4 inch seam allowance and the strap with a 1/2 inch seam allowance, the part that shows is about 2.25". The no stretch strap is attached to the elastic in the back as one of the last steps. The bra is put on and the strap is pinned to the front cup at the desired length, making sure the bra cups are pulled up to a perky height. Anne really hiked the bra cups up when doing this step. Mark seam on the strap and cup. Take the bra off and sew strap in place.

I have seen some really pretty bras sewn from the Elan pattern. I definitely want to make that one next.

VIntage Patterns - Resizing using a sloper - Part 1

I have a lot of vintage patterns. Most of them are not in my size. One day I told myself, "no more buying vintage patterns if you aren't going to do something with them." So I decided to try resizing one of them to fit me. I chose a 1940’s Vogue Couturier design pattern, number 380. It included a "fitted jacket with small inset godet at centre of dropped back-line. Loop and button closing below small stand-up collar. Long fitted sleeves. Skirt has straight front and godet flare at centre-back, shaped waistband. The blouse is described as a “tuck in blouse with cap sleeves cut in one with front and back. Built-up collarless neck- line.” The pattern was a size 12 - 32 inch bust, 35 hip. I have a 38 inch bust and a 41 inch hip. Major up sizing required. I have successfully completed the blouse and skirt. The review is on http://www.patternreview.com/ I have been asked for some info on my up sizing process, so the next few posts will be about that topic. I will start with the blouse.


There are various methods to resize a pattern. Since I have a custom fitted bodice sloper, I used the method described in Lynda Maynard’s self-published CD book De-Mystifying Fit: Using the moulage(sloper/block) to adjust commercial patterns. De-Mystifying Fit In her book, one of the examples she shows it the up sizing of the 1970’s Vogue pattern for the iconic DVF wrap dress. I had a Duh-Ha moment when I read it. Using my sloper also takes care of the normal fitting changes I have to make on any pattern. If you don’t have a fitted bodice sloper, you might be able to use a TNT pattern of a similar style to your pattern, or the fit bodice pattern of a pattern brand that customarily fits you well.

1. Study the pattern

Like many patterns from the 1940’s, the pattern pieces have no printing on them. The seam lines, darts, tucks and match points, even pattern piece names are indicated by little circular or square cutouts.


I find non printed patterns difficult to “read”. My first step is to spend time looking the line drawings of pattern pieces on the pattern instructions and note where tucks, darts, and key seams, are located. Then I look at the pattern pieces for the corresponding holes/markings for the tucks, darts, etc. that I saw in the drawings, as well as waistline markings, shoulder point - SP and neck point - NP. And finally I read the layout diagrams and sewing instructions.


From these I learned the back is cut on fold with a faced slit opening at the top. I made a mental note to consider adding a center back seam to facilitate my fitting issues and back closure construction. I also surmised that the blouse is supposed to be very fitted at waist and hips, because the instructions show a slide fastener (zipper) closure at the lower side in addition to the back opening. The instructions included a section on making 1” thick shoulder pads for the blouse. So I make a note to make sure there is space in the shoulder area for the shoulder pads. The unique pleats in the blouse front appear to be decorative and do no contribute to the bust shaping. It is helpful to have an idea of the fit of a garment, i.e. fitted, semi fitted, loose, etc. so that during the resizing the correct wearing ease can be added. The pattern pieces measured 36" in the bust area and comparing it to the pattern bust measurement of 32” indicates the wearing ease = 4 inches

2. Make a Copy of the Pattern

I don't want to cut up the original pattern so I make a copy of it. I lay a piece of tracing paper over the pattern and copy the pattern edge and all the dot markings using pencil.
Then I remove the pattern from underneath the tracing paper and mark all the seam allowances dart and tuck lines, hem lines and waist line with a marker and ruler so it looks just like a commercially printed pattern. There is no need to make copies of facings at this time because future alterations may change the shape of the facing pattern pieces.
Optional - cut off seam allowances to make pattern easier to compare to sloper, which have no seam allowances


3. Make a copy of Sloper

My slopers are heavy cardboard. I trace them onto Kraft paper and mark the darts because I am going to do some dart rotation on the sloper so that the dart locations are the same as the pattern.


4. Rotate sloper dart to match the dart location of the pattern.

I rotated half of the back shoulder dart to the armhole. The pattern has a slight easing of the back shoulder to the front so I left half of the shoulder dart to be eased onto the front shoulder seam.


5. Pattern Sloper Comparison - Back

Lynda suggests starting with the back because it fairly flat and changes will be simple.

Align the waist of the pattern to the waist line of the sloper and align the center back of the pattern to the center back of the sloper. I know there will be a lot of change to the back pattern piece because my back is long and curved at the top and I have forward shoulders and neck.


Back Vertical adjustments - Do these first.

The neck point of the pattern is almost 2” below the shoulder point of my sloper.

The neck point, the distance above the waist where the shoulder meets the neck, is a constant point of reference. It doesn’t change. Do not use the neck center back on the pattern. The pattern may have a lowered of raised neckline for design purposes and this information may or may not be printed on the pattern. To add length, I slash the pattern horizontally above the waist and spread the pattern so that the neck point (NP) match the sloper.


Back Horizontal Adjustments–

Compare shoulder width. My shoulder width matches the pattern.

Compare shoulder slope. The pattern shoulder slope matched mine exactly. But this pattern includes instructions for a 1 “shoulder pad so it is drafted for a person with sloping shoulders. I decide to us ½” shoulder pads not the 1” recommended by the pattern. To create space for the pad, I slash the pattern to the NP and rotating the shoulder seam up ½ inch.


The side seam should start about 1 inch below the arm hole on kimono style sleeves, according to a 1940 sewing book I have, so I slashed the pattern horizontally through the armhole so I can move the top of the side seam 1 inch below the sloper arm hole.

Waist - I compared pattern dart take-up to sloper dart take-up. My sloper back waist dart take-up was bigger than the take-up of the two darted tucks on the pattern. So I can use my sloper side seam as the guide for waist width.


I true up the armhole opening line.


next post - resizing the blouse front.

Tuesday, June 21, 2011

Bravo

Thanks so much for all your nice comments on my dress. I wore it to my son’s High School graduation ceremony last week. I made a point of linking back to the blogs of “new to me” commenters, and as a result I added a load of blogs to my Google reader subscription list.

While I was working on the dress, I had to set everything aside, and attend a Bra Workshop and Lecture I was signed up for. I was not really interested in sewing bras, but I always sign up and support garment/fashion related classes put on by the local ASG organization. Otherwise the course offerings start to skew into the realm of “Glitzy embroidery techniques for tote bags made of felted sweaters, pet hair, and dryer lint”. My thoughts about sewing bras: the fabrics are hard to find and sew, the construction techniques are difficult, and what with all the wonderful things RTW bras can do, why would I need to sew them?

The question "What kind of problems do you have with your current bras?” was on the pre-class questionnaire. When I reviewed my answer, “cup shape is not the same shape as I am, the shoulder straps fall off, and the back band hikes up” I started to think I might benefit from the class after all.
The class included a bra fitting session, a customized bra pattern, hands on sewing instructions and the guarantee that you would leave the class with a complete, custom fitted bra. The instructor was Anne St Clair, owner of Needle Nook Fabrics in Wichita, Kansas. She has become known as “The Bra Lady” on the sewing expo and ASG education circuit.

Day 1 - Anne fit each of us in a bra during a short, private 1 on 1 session. She had brought close to 90 sample bras for the fitting exercise. During the fitting she noted any changes that needed to be made to the pattern. That evening after class, she and her assistant Janet, hand drafted a custom pattern for each of the attendees, based on the changes noted during the fitting. We received a packaged bra pattern, either the Elite and Queen Elite based on our bra size, plus customized pattern pattern pieces, as well a list of the exact lengths for the elastics for the band bottom, under arm and center front, and the underwire size.
Anne encouraged us to compare our customized pattern pieces to the packaged pattern pieces so we could see the modifications she had made.
The afternoon of day 1 was a lecture on what makes a well-fitting bra, and how to make changes to the pattern to achieve it. Also discussed was modifying the pattern to make nursing, exercise and sleep bras. And making bras out of nontraditional fabrics like poly/lycra , cotton/ lycra, and wovens. To “support” her lecture, Anne would lift up her T shirt, made in a cute cotton/lycra print and show us on her own bra, which was made in the same fabric as the T shirt. We were all a bit startled the first time she did it, but it was a very good visual.

The second day of class we were split up in groups. Each group was guided through all steps of the bra making process, from cutting the fabric through the final step of sewing on the straps. I was surprised to find that the sewing was not that difficult. The stitching was either straight or zigzag, with a decorative stretch stitch thrown in as an alternative to the zig-zag. The seams are all rather short so sewing went quickly. Tricot fabric, used for the lining on the cup, can be a bit slippery, but there were tips and tricks taught on how to deal with it. Roseana’s blog post has great pictures of the class she took with Anne and the tips. Class Pictures

At the end of the day we tried on our completed bras for a final fit confirmation by Anne. We left the class with the completed bra, and enough fabrics and elastics remaining in the class kit to make two additional bras. I was amazed that I had a completed bra and how well it fit. The cup shape modifications Anne made included dropping the cup seam by ½ inch so that it crossed my apex, and removing some of the curve in the center front cup seams. My straps stay in place because they are none stretch and cut to the length I need for each shoulder, one of which is lower than the other. The straps are attached to the bra above the apex in the front and closer to the center in the back so there is no slippage. We were told that RTW bras have stretch straps with adjusters in order to fit a wider range of customer shapes. With custom made straps the only stretch needed, for ease of movement, is provided by a small piece of elastic where they are attached to the back band. And the back band stays horizontal across my back. It is also one size smaller than I was buying in RTW, but the difference that makes to the fit is incredible and it is not uncomfortable.
Anne had prepackaged bra kits with unique fashion fabrics and matching elastics, tricot, power net /mesh and hooks for sale for $12-15. This was a great price for a kit that includes all the materials to make a bra. Especially since the bra fabrics, plush back elastics, appropriate laces and the fittings; rings, underwire, or hooks, cannot be found in local fabric stores.
My only dissatisfaction with the class was the printed instruction materials. The pattern instructions and the separately purchased book were not complete and the illustrations were poor. Sewing steps were left out or in a different order than presented in class and the illustrations were originally black and white photos that had been rendered fuzzy and unrecognizable by copying copies instead of originals. So the week following the class, I sewed a couple of the kits together to reinforce the steps in memory and added notes to the instructions. Here is the rather basic bra as completed in class; thin tricot cups, high front, underwired, no padding.

My second bra was to made from a poly/ lycra animal print knit. The key to using other fabrics successfully is to maintain the structural integrity of the bra by compensating for the different weights and stretch of the materials used. In this one the fashion fabric is used over the power net of the band and the tricot of the cups so that the original stretch and support is maintained.

My third bra had some light padding (fusible fleece), a poly cotton nude knit with the same stretch characteristics as tricot for the cup lining, and a woven jacquard poly nylon fabric cut on the bias for the cups. Again the power net and cup lining maintains the support.


I am really glad I took this class. I learned so much about bra fitting and alterations. Being shown the steps for constructing a bra eliminated all my concerns about sewing nylon stretch fabrics. And I can take the learning’s from the class and apply them to the sewing of other bra, swimsuit, and corset patterns that I have in my collection. Here are some recent purchases.


,

Wednesday, June 1, 2011

Carolina Herrera Dress Knock-Off - Finished!

Remember the inspiration dress?
Well here is my knock off. All finished, yeah. I am surprised how much it looks like the inspiration dress.
It took lots of research, planning, samples, ripping out (oh yes) but overall it was enjoyable. I missed completing the dress by the contest deadline. No long holiday weekend for me. I work in IT for a company that regards holidays as an opportunity to work. My employer moved their data center from NY to NC this weekend. I helped and I have the cup to prove it.
Don't get me wrong, I am grateful for having a good job that finances my hobbies. No matter, I use the contest end date as a self-imposed deadline. Here are some closeups of the details.


Carolina Herrera Dress Knock Off - Part 3

One of the features of the CH dress that caught my eye was the ruching around the neckline. Ruching (rooshing)is a French term that means gathering, ruffling or pleating. Ruching has been used to embellish garments for hundreds of years. I have loved this detail since first seeing it in the book Decorative Dressmaking. This book is a good addition to a sewing library, especially for inspiration. The book takes a technique, such as ruching, faggoting, piping, pin tucking, etc. and presents a collection of pictures showing the technique used in garments over the years. Then the author sketches ideas for using it in current garments , as well as providing direction for one garment (warning - circa 1990’s). I have several patterns in my stash that feature ruched trim.


I have made this Vogue DK T-shirt, which was donated to Goodwill because I used a poly sheer for the inset ruching and it puffed unattractively, and the Burdastyle jacket below.


Both used a method of inserting the ruched strip between two seams. The fabric to be ruched is cut in a strip on the straight of grain. The width of the strip is determined by the width of the desired insertion. The length will be determined by the fabric weight and the amount of gathering desired. Gathering stitches are sewn along each cut edge. The stitches are pulled so that the strip is gathered to the finished length and inserted into seams on both sides.

Sample 1 is an example of this method I considered for this dress. One side of the strip is inserted in the band to bodice seam and the other is finished off with a wide bias binding to
create the dark border.


On the close up photo of the dress neck line, I could see what looked like a line of stitches ¼ inch from the edge of the ruched strip and it didn’t look like the strip was inserted into a seam. Sample 2 was my first attempt to acheive that look. A strip of the silk chiffon was cut on the straight of grain. A small hem of 3/8 inch is turned under on the long edges before sewing the gathering stitch ¼ from edge. The strip was gathered and top stitched in place sewing ¼ from the edges, over the gathering stitches. But the double layer on the outside edge appeared more opaque than the rest of the strip. Not quite what I was seeing on the dress.


The third sample was a bias cut strip of chiffon, gathering stitches sewn slightly more than ¼ from the cut edge. I gathered the strip and top stitched to neckband ¼ inch from cut edge. The bias cut edge does not fray and gives a softer edge look to the ruched strip. You can even trim it after applying, if you didn’t stay 1/4 “ from the edge.

The method used for Sample 3 was the one I chose to use on the dress based on the finished appearance. I love the look of silk chiffon fabric, but I dislike working with it because it is so light weight and hard to control. My bias cut white chiffon stripes acted just like long slithery ghost snakes; slipping, sliding, changing width, catching on any rough surface, aarg! And my chiffon fabric was 52 inches wide which is great for long bias strips, but bigger than most home sewer's cutting tables. The wool rug in my living room came in handy for cutting the bias strips. I lined up the edges of the silk square with the edges of the border in the rug and the texture of the rug kept the silk from shifting while I cut the strips using sharp shears.
The neckline inner edge also had brown sheer fabric that extended beyond the dark band , softening the edge. To achieve this I used a bias cut strip of brown chiffon that when folded double measured ¾ inch wide. I sewed it ½’ from the finished neck edge. so that it extended beyond the edge by ¼ inch. In the picture below the facing has not yet been sewn to the front band and the brown chiffon appears flush with the band inner edge.


This method of finishing an edge was used in the Vogue Issey Miyake pattern 2796 below. You just never know when those weird IM techniques will come in handy.