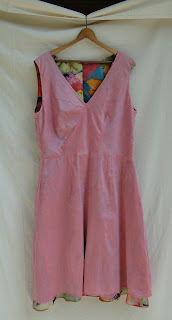
I just finished Vogue pattern 1223. It is a mid knee length lined dress, fitted at the bust with pleated front and back skirt, a back zipper and narrow hems.

I liked the diagonal tucks on the front bodice that release into pleats on the skirt. And I thought it would be a good pattern for one of the big prints that are everywhere this summer. The tucks lines would break up the print, but you would still get the color impact. The recommended fabrics were chiffon, crepe de chine, and organza. Chiffon is my nemesis fabric, so no way on that one, I found some lovely big prints in silk charmeuse, but they were in the $25/yard range. Too much money for me to risk on a style and pattern I hadn't made before. And they were shiny. I prefer matte finish silks. So when I found a bright tropical print in woven rayon on sale at Hancock Fabrics, I bought it. If all the work resulted in a wadder, I wouldn’t feel too bad. This style was a bit hard to evaluate for fit. I ended up pinning the tucks in the front pattern pieces, pinning the 3 pieces together and holding the pattern up to my body to evaluate the fit, matching the shoulder seams to my shoulders and checking the waist location and width. No changes needed. I did make my normal length changes to the bodice back. The front pieces have to be cut out in a single layer and all those tucks have to be marked. So there is a lot of prep work before sewing can start. I cut out large pattern pieces like this on my kitchen floor. The linoleum blocks also help me square up the fabric.
I remembered seeing a picture of this dress on the model where she wasn’t swirling the skirt(maybe in the Vogue Pattern magazine) and the front hem was not even. I think this is due to the diagonal tucks and how the fabric hangs when released on the bias. This will vary with the fabric used.
 I definitely had the same problem with my fabric. It is easiest to see on the mannequin. But even with my hips filling out the dress the sides were still lower than the center front. To even up the hem I used my handy dandy Dritz Chalk Hem Marker. This is a goofy looking device with a nozzle that you fix to the desired height from the ground where you want your hem to be. You stand, wearing the garment you want to mark the hem on, with the nozzle very close to the fabric. The nozzle is attached to a bulb you hold in your hand. When you squeeze the bulb, a jet of air shoots chalk through the nozzle onto your garment. As you slowly rotate and continue to give the bulb more squeezes, the hem will be marked the same distance from the ground all around your garment. You should not be looking down when you do this, like I am in the picture, because it affects the hang of the dress. I am looking down because I hadn't used this gizmo in a while and wanted to make sure the chalk hadn't run out and needed refilling.
The chalk will brush off so easily, I immediately insert pins at the chalk marks or mark them in wash out marker to make them more permanent and visible.I trimmed the bottom edge along the marks

Both the hem of the dress and the hem of the lining were done with my rolled/narrow hem foot. It made the hemming go very quickly.

I used a very light weight silk cotton woven for the lining. I had bought it to make a blouse but it was too thin for that. It worked great for a lining.

I am so pleased by how well this dress turned out, I may make it again silk.


