

There are various methods to resize a pattern. Since I have a custom fitted bodice sloper, I used the method described in Lynda Maynard’s self-published CD book De-Mystifying Fit: Using the moulage(sloper/block) to adjust commercial patterns. De-Mystifying Fit In her book, one of the examples she shows it the up sizing of the 1970’s Vogue pattern for the iconic DVF wrap dress. I had a Duh-Ha moment when I read it. Using my sloper also takes care of the normal fitting changes I have to make on any pattern. If you don’t have a fitted bodice sloper, you might be able to use a TNT pattern of a similar style to your pattern, or the fit bodice pattern of a pattern brand that customarily fits you well.
1. Study the pattern
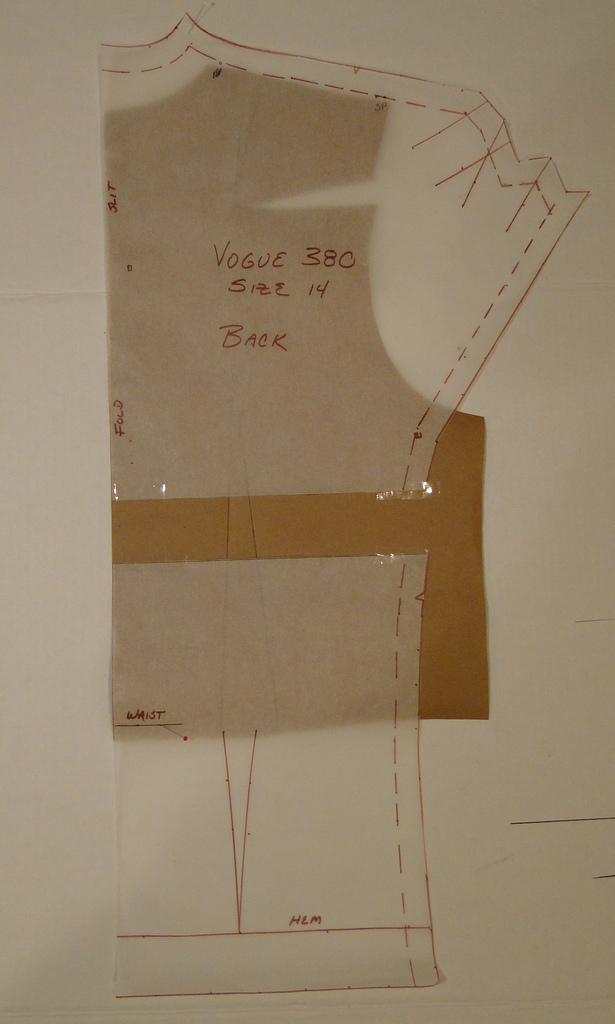
Like many patterns from the 1940’s, the pattern pieces have no printing on them. The seam lines, darts, tucks and match points, even pattern piece names are indicated by little circular or square cutouts.

I find non printed patterns difficult to “read”. My first step is to spend time looking the line drawings of pattern pieces on the pattern instructions and note where tucks, darts, and key seams, are located. Then I look at the pattern pieces for the corresponding holes/markings for the tucks, darts, etc. that I saw in the drawings, as well as waistline markings, shoulder point - SP and neck point - NP. And finally I read the layout diagrams and sewing instructions.

From these I learned the back is cut on fold with a faced slit opening at the top. I made a mental note to consider adding a center back seam to facilitate my fitting issues and back closure construction. I also surmised that the blouse is supposed to be very fitted at waist and hips, because the instructions show a slide fastener (zipper) closure at the lower side in addition to the back opening. The instructions included a section on making 1” thick shoulder pads for the blouse. So I make a note to make sure there is space in the shoulder area for the shoulder pads. The unique pleats in the blouse front appear to be decorative and do no contribute to the bust shaping. It is helpful to have an idea of the fit of a garment, i.e. fitted, semi fitted, loose, etc. so that during the resizing the correct wearing ease can be added. The pattern pieces measured 36" in the bust area and comparing it to the pattern bust measurement of 32” indicates the wearing ease = 4 inches
2. Make a Copy of the Pattern
I don't want to cut up the original pattern so I make a copy of it. I lay a piece of tracing paper over the pattern and copy the pattern edge and all the dot markings using pencil.

Then I remove the pattern from underneath the tracing paper and mark all the seam allowances dart and tuck lines, hem lines and waist line with a marker and ruler so it looks just like a commercially printed pattern. There is no need to make copies of facings at this time because future alterations may change the shape of the facing pattern pieces.
Optional - cut off seam allowances to make pattern easier to compare to sloper, which have no seam allowances

3. Make a copy of Sloper
My slopers are heavy cardboard. I trace them onto Kraft paper and mark the darts because I am going to do some dart rotation on the sloper so that the dart locations are the same as the pattern.

4. Rotate sloper dart to match the dart location of the pattern.
I rotated half of the back shoulder dart to the armhole. The pattern has a slight easing of the back shoulder to the front so I left half of the shoulder dart to be eased onto the front shoulder seam.

5. Pattern Sloper Comparison - Back
Lynda suggests starting with the back because it fairly flat and changes will be simple.
Align the waist of the pattern to the waist line of the sloper and align the center back of the pattern to the center back of the sloper. I know there will be a lot of change to the back pattern piece because my back is long and curved at the top and I have forward shoulders and neck.

Back Vertical adjustments - Do these first.
The neck point of the pattern is almost 2” below the shoulder point of my sloper.

The neck point, the distance above the waist where the shoulder meets the neck, is a constant point of reference. It doesn’t change. Do not use the neck center back on the pattern. The pattern may have a lowered of raised neckline for design purposes and this information may or may not be printed on the pattern. To add length, I slash the pattern horizontally above the waist and spread the pattern so that the neck point (NP) match the sloper.
Back Horizontal Adjustments–
Compare shoulder width. My shoulder width matches the pattern.
Compare shoulder slope. The pattern shoulder slope matched mine exactly. But this pattern includes instructions for a 1 “shoulder pad so it is drafted for a person with sloping shoulders. I decide to us ½” shoulder pads not the 1” recommended by the pattern. To create space for the pad, I slash the pattern to the NP and rotating the shoulder seam up ½ inch.

The side seam should start about 1 inch below the arm hole on kimono style sleeves, according to a 1940 sewing book I have, so I slashed the pattern horizontally through the armhole so I can move the top of the side seam 1 inch below the sloper arm hole.
Waist - I compared pattern dart take-up to sloper dart take-up. My sloper back waist dart take-up was bigger than the take-up of the two darted tucks on the pattern. So I can use my sloper side seam as the guide for waist width.

I true up the armhole opening line.

next post - resizing the blouse front.


Great post - thank you for sahring it with us :) !
ReplyDeleteCan't wait to read more posts from you on this topic.
The use of your sloper reminded me of this handy article by Threads Magazine: The Merits of a Basic Fitting Pattern.
I think everyone (myself included LOL!) should have a set of basic slopers - just think how much fitting time (not to mention fewer muslins needed) we'd all save :)
This is so useful. I also have patterns - Vintage and not so vintage that are not in my size.
ReplyDeleteFascinating. Thanks for doing this! You have saved me some brain cells...
ReplyDeleteGreat post! Thanks for taking the time to record this process to share with us.
ReplyDeleteThat's a substantial effort! Thank you for showing us how you did this - it's good to know it can be done (if I really want to make those old patterns that I seem to have stockpiled). And I think I would like a heavy cardboard sloper like yours very much...
ReplyDeleteThis is something I have always wanted to do! Thank you so much, I will study this series of posts VERY carefully!
ReplyDeleteCool! I get requests for this too, and it's good to see you are doing a series! FUN!
ReplyDeleteExcellent. Thanks for this tutorial.
ReplyDeleteI have a basket full of vintage patterns that someone gave me a few years ago. I love the idea of making them up, but it seemed so complicated to adjust such detail-filled designs.
ReplyDeleteThanks for posting your experience...I will bookmark it as a reference for my plunge into the vintage file!
Such a useful post - thanks. I haven't used many vintage patterns, although there are so many beautiful, intricate styles that you don't see the like of in modern RTW patterns. The blouse is amazing.
ReplyDeleteVery useful and clearly explained, thank you. I'm not sure I'm brave enough to try it, but I love seeing it done. I should really develop that sloper....
ReplyDeleteYou have explained this so clearly, what a terrific post. It makes me want to get out some vintage patterns (that don't fit)
ReplyDeleteOh yes, I greatly appreciate this post (and succeeding) to you, I'm starting with vintage patterns and this really helps me. Thanks!
ReplyDeleteAre there any plans on finishing this series and can you explain how to find the neck point?
ReplyDeleteThanks for the great post, but I'm a little confused about the wearing ease. Does it not still need to be added to the adjusted pattern since you are comparing it to your block which has no wearing ease. Is that coming in a future post?
ReplyDeleteThank for this tutorial. I finally completed a fitting shell pattern but I didn't know how to apply the fitting shell to use with other patterns. Thank you, you solved my mystery.
ReplyDeleteFabulous tutorial. I have been searching this sort of sloper information for a long time and your post states it more clearly and logically than any I've found. Thanks so much, Audrey.
ReplyDeleteI just found your website, even though it was written back in 2011.
ReplyDeleteIt is the best explanation of how to use I sloper I have found... It makes sense now why I would make, and use a sloper. Today, I'll be using a "shift dress" pattern that I've altered and made to fit me as my sloper, and now I know how to go about it. THANK YOU!
I loved reading this, even though I have no idea about any of it. :)
ReplyDeleteI have just found your website, also and now have these wonderfully clear instructions on what to do with a sloper! Fantastic. Thank you so much!!
ReplyDeleteAudrey, thank you for sharing this process. Such a clear explanation with all the essential steps.
ReplyDelete