Monday, April 29, 2013

Spring Colors

I had a very pleasant vacation in FLA, This is the "Where’s Waldo" view from our 19th floor condo.


The lovely view from the upper  floors was offset by woefully inadequate elevators. There were 20 minute waits during check in and peak times when everybody was going to or coming back from the beach. Is that normal in high rise resort hotels? It was the first time we have stayed in one. I thought I would return from FLA with lots of motivation to sew spring clothes, having just enjoyed warm weather, bright colors, and being well rested. It didn’t work. I dithered away valuable sewing time looking through  my pattern and fabric stashes, but nothing inspired me. I think my problem came from having too many fabrics and patterns choices.

Mid-month I read about the Pattern Review.com "2013 Spring Pantone Contest". The rules: Sew a two-piece outfit for a woman or a man. The two pieces must be able to be worn together. And the 2013 Spring Pantone colors must be the prominent colors in the outfit. 


The contest gave me a  specific goal  combined with some room for creativity. The teal, green and orange colors are my summer “go to” colors and I had some in my stash. I was inspired.  I have an actual Pantone color card set. When  the contest picture above is printed on the home printer, some of the colors do not quite match the same numbered color on the Pantone cards. Just for fun I took the cards to my local Jo Ann and Hancock Fabrics stores. Not surprising, they don’t appear to subscribe to the Pantone service and are out of the color loop. There was not much selection in the colors above.  The colors I chose for my outfit were Grayed Jade and Nectarine


 Because I was starting a bit late in the contest sewing time, pattern choice was driven by ease of construction. New Look 6194, a cute cropped jacket over a fitted top caught my eye.


The top is a simple shape, shaped hem, and front and back darts,. Bias bands are used to finish the neck and armhole openings.  I liked them on the armholes, but not on the neckline. I think I will use a bias binding on the neckline next time for a more controlled finish. The fabric is a tie dye print poly. There is supposed to be a zipper in the side seam, but with the light weight fabric and my shape, I am able to pull the top on over my head without a zipper.


The jacket is supposed to be lined to edge using  the garment pattern pieces to cut the  lining.  My first thought was this would be  easier/faster to sew than facings and a turned up hem  combined with a lining.  But I  remembered my personal experiences with lined to edge jackets.  If the cutting and sewing is not super accurate, there is the potential for the lining to be smaller or larger than the outer fabric.  So I drafted  facing patterns and added hem allowances to the garment  pieces.   A bit more work – but a better chance of a good looking jacket. Also there was no ease in the lining, so I added a center back pleat.
Lining
The back neck edge did not lay flat on my upper back. I have some curvature there.  Adding a couple tucks took care of that.
Back Neckline Tucks


Wednesday, March 27, 2013

Stretched

It has been a month since I posted and though I have done a lot of sewing related activities, I don't  have  much to show you.  I prepared and gave a presentation to my local ASG group on Hidden Elastic Waistbands. That required lots of preparation and samples.  I made muslins of these two jackets. One from  My Image

My Image Jacket 1254 

and the other  Lutterloh.  Both required only minor alterations, but after making the muslins in non-wearable fabrics, I lost interest in making the fashion garment.    The Lutterloh jacket  required enlarging an itsy bitsy drawing to full size.  I got sidetracked into trying to enlarge it electronically using a freeware graphics software called Inkscape.  The software is great and I learned a lot, including that the enlargement process wasn’t as easy as I hoped it would be.    I did find some online resources for using this type of software to draft patterns, and am playing around with that. Perhaps these activities will be the basis for future blog posts.

The only wearable garment sewn during this time was a rather simple knit top. I had a RTW cardigan that I had never worn because I did not have a top in the right style and color to wear under it. I wanted a boat neck knit top in a dusty purple color.  I had the fabric, but no TNT  pattern I could use to make the top. I am always envious of sewing bloggers who make the latest knit top pattern with stunning results and no fit problems.  I don’t have that kind of luck.  I have fitting problems with knit garments too. I have a bodice sloper for woven fabrics that I can compare to printed patterns. And thought it would be great to have a bodice sloper for knits.  But how to get one? There isn’t a lot of  info in books or on the Internet, but here is what I found. There appears to be four ways to go about it.

1. Manually draft a bodice sloper for knit fabrics using personal measurements and instructions.

Books

Winifred Aldrich - Metric Pattern Cutting for Women's Wear has instructions for drafting two close fitting blocks, one for very stretchy fabrics (-11 cm wearing ease in circumference)  and one for moderate stretch fabric (-4 cm)

Pattern Drafting for Fashion : The Basics by  Teresa Gilewska  has instruction for a basic knitwear bodice with no ease.

Internet

Pattern School  a site’s who's main emphasis is stretch-fit pattern making, has instructions for manually drafting a one piece  (what I would call a leotard)  block that can be used as the basis for  a top. On the "Lazy People" tab of this website, there is a screen where you can enter your  own measurements and  the stretch % of your fabric  and it will generate the block for you in  .svg file format. Unfortunately you will have to import the  svg file into a graphics software to manipulate and save it  in a format which can be tiled and printed on 8.5 x 11 paper. I use the freeware PosteRazor to print poster size patterns on 8.5 x 11" paper.  

2. Make changes to an existing  woven fabric bodice sloper

Sources for instruction on adjusting an existing block for stretch fabrics are

  •  this post at  The Sewing Space  In her "free stuff" she  has a stretch gauge to use to determine the % stretch of your fabric. The amount of stretch in your knit fabric will determine the amount of ease desired in a pattern for a knit.

  • Reportedly, a  small section in Patternmaking for Fashion Design by Helen Joseph-Armstrong, which I don’t have in my sewing library so I can't confirm.

  • And  advice posted on sewing discussion boards:

Advice 1 - “Use close fitting sloper for wovens and increase all seam allowances by 1/8th inch.”
Advice 2 - “Reduce the ease in the circumference of the bodice by folding out a ¼ inch  vertical tuck midway on the shoulder all the way down to the hem on the back and front pattern piece.  This  also reduces  the width of the shoulders, but leaves the neck alone.  Drop the shoulder just slightly and raise the armscye to make the armhole fit closer to the body. The sleeve width should  also be reduced, which can also be done with the same vertical tuck process.

The issue with the advice above is that is does not take into consideration the wearing ease of the block you are using as the basis for the changes, nor the stretch of your knit fabric.

3. Drape a knit fabric, similar in stretchiness to the one to be used for the garment, on a dress form or have a friend do it on you.

Books

The Essential Guide to Stretch Pattern Cutting  Shoben Fashion Media available at Center For Pattern Design

 Patternmaking-Made-Easy-  by Connie Amaden Crawford  Who says "A true knit bodice can only be made by draping and smoothing the dart excess out at the shoulder, armhole and side seams."

Both of these sources are a bit pricey.

4. Make a knit top pattern over and over again , adjusting each time for a better fit.  This seems to be very popular with younger sewing bloggers, using a popular top pattern from an independent label as their starting point.

Based on my experience, even slopers drafted from my personal measurement require quite a few fitting changes because of my back shape.  So just for kicks I decided to drape a knit fabric on my paper tape dress form, which is a good replica of my body (reality sucks!)  Initially  I used the very brief instructions from  Crawford's book.  One of my big questions about draping a knit was whether the fabric  should be stretched smooth in all directions, which was nearly impossible, or if  some wrinkles were permitted. The Shoben pamphlet suggests using a shoulder bust dart initially, so the bust won't be flattened and then transfer it into ease at the side seam as one of final steps.  That helped with the wrinkle issue and prevented the dreaded flattened bust (who knew?) .  Below are some pictures of my draping exercise. That ring on a string is my improvised plumb bob for determining the vertical seam on the back.

Draping a knit on dress form - Back

Draping a knit on dress form -
Front
  I  compared the resulting knit bodice sloper  to my woven bodice sloper,   Amazingly the results were very much like what was recommended on the discussion boards.The shoulders were more sloped, the armhole higher.  Less ease in bust and hip area.  And the curves in the sides and back were rather funny looking as predicted by The Sewing Space article. The front was much wider than the back, to accommodate the bust ( and my tummy).  One important learning from all this research was that block or patterns for knit garments may be longer in length than blocks or patterns for woven tops. That is because some of the length is taken up when the knit stretches around the body, so don't shorten the length before trying on the garment. I have made  knit tops in the past and cut off what I thought was excess length in the flat pattern pieces, only to find the finished garment a bit short. Duh!

  Here is what the red knit sloper looked like when compare to woven sloper ( green tag board)


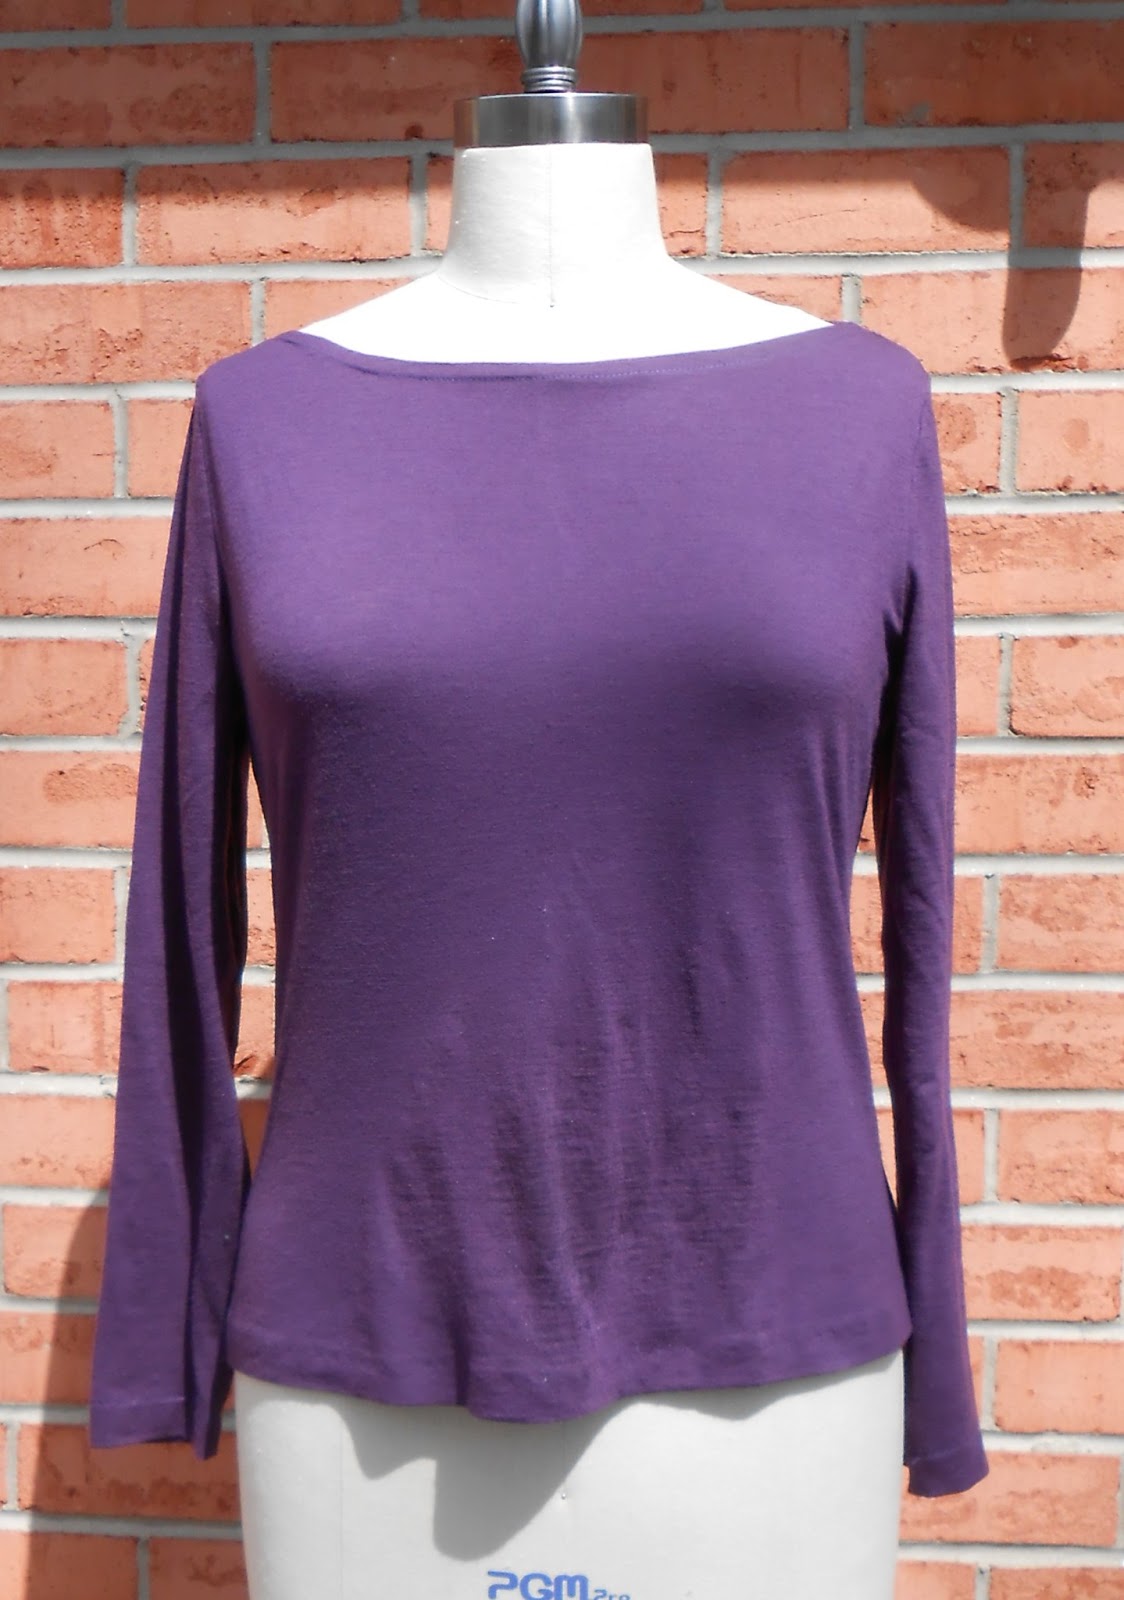
I use the knit sloper  and compared it to this  Burda  pattern 1/20122 123,


narrowed the upper chest and neckline of the pattern , and sewed it up. It fit well and looks great with the cardigan.


Less that 24 hours after taking the pictures above, the back yard looked like this.
 
  I am tired of this highly changeable weather. Have you seen the Internet cartoons about  Rudolph the Reindeer helping the Easter Bunny deliver Easter holiday treats to the kids this year?  DH and I are heading to Florida in a couple of days as the Spring Break  "chaperons" for a group of 18 year old boys.  They aren't thrilled about the chaperon bit,  but that was a condition of us paying for the condo and other essentials for the trip. They will have plenty of time to "go wild" when their expenses are no longer being charged to my cost center.  And I like having an excuse to go somewhere with warmer weather.

Sunday, February 24, 2013

S Curve

A family member  decided to help me with the laundry recently.  I wish he had warned me so I could have rescued garments in the laundry pile that needed special treatment.  As a result a silk chiffon blouse was agitated to death in the washing machine by a load of jeans and towels. It emerged a shrunken, faded semblance of its former self. I made a replacement blouse and chose the fabric for its colors.  It is a polyester and yes, I am a poly snob.  I wish this print was available in silk.  I was half tempted to scan the fabric and send the scan to a “print your own fabric” service like  Spoonflower to  have it printed on silk.


 The blouse pattern is a semi fitted tunic with front and back gathered into band collar. The front buttoned band forms a pleat. The full length sleeves have elasticized wrists. I always choose raglan sleeves for  fast sewing projects andam then reminded that they are not a flattering style for my small shoulders.  Ah well.


Once the blouse was done and I had worn it with my magenta wool pants, I wondered what else I could wear it with.  Black pants certainly and possible a black skirt, if I had one.  A black skirt is a versatile wardrobe basic, but they always remind always me of the black skirts I had to wear for girls’ chorus and waitressing jobs in my youth.  Leather and fabric is big this year, so I decided to do a black skirt using the black leather and fabric in my stash. The pattern is Burda skirt pattern 103 from  5 2006.

.


  It is a basic straight skirt with contour waist band and center front seam with kick pleat.   The interesting bit is the “side seams” are S-curves. Because of the odd pattern pieces and darts, I made a muslin of the skirt out of a mid weight cotton to test the fit.  The fit was good except my high hip caused the center front seam to hang off vertical. This was easily fixed by adding 5/8 inch to the top of the skirt on the high hip side.


To accent the seaming I used leather for one section of the skirt and black wool gabardine for the other.


Some construction details: I marked the darts on the back of the leather with chalk
darts marked on leather with chalk

 and I  used an iron-on woven stay tape to stabilize all seams on the leather pieces.


Fusible woven stay tape on seams of leather


  Yes, you can iron leather.  Test on a sample to determine the best heat setting, and if steam is any benefit.  The thread used for construction and top stitching was  Coats and Clark poly thread. The needle, a size 12/70 Top Stitching.  Darts, hems and non top stitched seams in the leather were glued flat with a glue that dries flexible and is designed for porous surfaces.  I used leather adhesive, but SOBO or rubber cement can also be used.
The original skirt had zippers the entire length of each curved side seam. A 20 inch one from back hem to just below the pocket on the front,  and a short zipper from waist to the bottom of in-seam pocket. Talk about air conditioning, No way on the whole seam zipper, but  I did  mentally dither over adding the in seam  pockets with zipper openings because of the unfamiliar  insertion process and hand sewing required. And the uncertain success of top stitching through 2 layers of leather and the zipper tape.  In the end I knew I would be unsatisfied with the skirt if I did not put in the pockets, so one weekend I just did it.   I sewed the seams together, basted the zipper to the seam allowances, top stitched 1/4 inch from seam on both the leather and fabric through the zipper tape.

Zipper basted to seam allowance


Top stitching with Teflon foot 


  Sewed the pocket facing to the zipper tape on the lower side, and the pocket lining to the upper zipper tape by hand , and then sewed around the outside edges of the pocket by machine.


pocket facing slip stitched to zipper tape
   I also created a lining pattern by eliminating the curved side seam. There is an invisible zipper inserted in the center black seam in the leather.  I thought this might be tough to do but it actually was done quite easily since the stay tape kept the leather from stretching.

zippered pocket

Curved Hip dart


Skirt back


Sunday, February 10, 2013

Black and Blue

I got into one of my closet clean out moods recently, and as I reached the back recesses of the cedar closet, I found a pair of  never worn,  me made wool pants. And there next to them was the jacket they were to have been worn with.  Made from Vogue  2952, an  Issey Miyake pattern from 2007.


The jacket is pretty plain in the front, but the center back is cropped with lacing over the opening, I remember making the pants in the same color as the jacket to make the lacing less obvious. But I never wore the jacket because I did not feel comfortable in it.


I tried on the pants and they fit great. I had some soft poly knit that matched the pants perfectly.  I have always wanted to make Vogue 8323 and had just seen it modeled at a recent ASG meeting "Show and Tell".  I liked this pattern for the shoulder princess seaming, which is great for shaping and fitting.

 I decided to make a muslin, probably because I had just finished watching two classes at Craftsy.com, Lynda Maynard's Sew the Perfect Fit  and Barbara Deckert's Plus Size Pattern Fitting and Design, both of which used muslins to resolve fitting problems. And both great classes BTW! I am glad I made the muslin. The shoulders were too wide, the sleeves too short and the neckline, shown as standing up along the neck in the pattern drawing, sagged and caused the front to gap. Also on my copy of the  pattern, there seemed to be misprint on the part of the center front piece that folded over to make the facing. It was not the same shape as the part it was supposed to face.  I corrected the facing shape, lengthened the sleeves and shaped the collar to fit up against the lower neck and then folded over.   I also shortened the shoulder seam. My first impulse was to take the extra shoulder length off the armhole edge, but I remembered how Cynthia Guffey altered my princess seam jacket for the same problem by taking in the excess at the princess seam.  That also keeps the placement of the princess seam in the middle of the shoulder seam. I am quite happy with the top and the way it  coordinates with the pants. Our ASG group is having a 5 piece SWAP challenge and I do believe these two pieces will be the start of my SWAP.


 So the top and pants are the blue of the post title. What is the black?  And why don't I have any pictures of me in the top. Because of these guys, who suddenly showed up  and decided to take up residence on the deck outside my sewing room  where I take my pictures.


They are black vultures. I sew three feet from the door where this picture was taken. Kitty decided she wanted to go out one day. I was looking down, trying not to step on her,as I opened the door. I  looked up, and we both froze. I quickly shut the door.  Day 1 they sat all day on the railing in the drenching, freezing rain. Day 2, I heard a sound at the  door and was unnerved to see one standing on the welcome mat, tapping on the glass of the door.  

 When I sent out our attack cat in full bristle mode, or DH yelling and waving his arm like a lunatic, they would fly to a nearby tree.  But back they would come.  Screaming and waving at them is one method suggested by a Google search of the problem,  Vulture eat carrion, or garbage in populated areas. I checked the garbage cans to make sure the covers were tight and looked  under the deck in case some animal  had crawled under there and died, but all was clean and tidy.   After 5 days they quit coming to the deck,  but they are still in the neighborhood. I see them and a bunch of their buddies perched in a neighbor's tree.

Saturday, January 12, 2013

Burda Back Issue Benefits

I have a large collection of Burda World of Fashion pattern magazines. I started my subscription in the 1980's after I discovered a Spanish language issue on the newsstand in Cancun, Mexico. It was my favorite souvenir of that vacation trip. Yes, in the early days I was intimidated by the need to trace the patterns, and though I admired the garments featured in the magazines each month, many were beyond my skill level.  But now  I consider those old issues to be a wonderful extension  of my pattern collection. While I might not have been able to use them to their full extent back then, they have since proven to be a wonderful resource as my lifestyle, size, and sewing skills  changed.   Many of the garment styles are classics  and  look current when made in the latest fabrics. I can now trace a pattern in about 30 minutes and I appreciate the benefits of fitting and altering a pattern with no seam allowances. My sewing skills have improved. I don't need to rely on the magazine instructions which can sometimes be difficult to follow. My size has changed over the years, but whatever size I am is available in those magazines. When my sons came into my life, I searched  the  back issues for baby clothes and later pants and shirt patterns.  The Burda kids patterns always fit my sons better than those of the  big 4 pattern companies.  And as my sons grew, I just traced a bigger size of a favorite pattern.  When I read that someone is giving away old issues of Burda WOF magazines citing reasons like "no styles I like" or "too much work tracing the patterns and adding seam allowances", I shake my head and think to myself, "They don't realize the value of what they are giving away!" At least in the blog sphere, there is a good chance their discarded issues will find a loving, appreciative home.

  Where am I going with all this? Well, the last two additions to my wardrobe were inspired by recent fashion photos, but the patterns were from Burda WOF back issues. The first was a blouse. I loved this Jennifer Chun blouse, from her Fall Winter 2012 collection, in a silk foulard print with contrasting paisley print trim.

Finding the fabrics for a similar look was not an easy task. The main silk fabric came from Fashionista Fabrics, which unfortunately is shutting down its Internet site. And the contrast silk fabric was purchased from an Etsy shop. The pattern, a classic woman's blouse with bust darts, shoulder yoke and sewn on placket is from Burda 9-2009.
Burda 9-2009 105
I drafted the pattern pocket myself. I love the fabric combo and it really livens up a black suit.


The second item was a pair  of color blocked pants. Many designers showed color blocked pants for Fall 2011, and the same styles have  shown up in RTW this winter.

Derek Lam
The pattern  I used is from Burda 5-2006, pants pattern  112. They were shown made from one fabric, but the style lines matched those of the color blocked inspiration pants. I modified the curve of the pocket opening. Curved pocket openings are often found on jeans and casual clothing.  A slanted opening is more tailored and replicates the inspiration pants.To keep the color blocking somewhat subdued,  I used black and dark green worsted wool that has been in my stash for ages. 

Burda 5-2005 112


Colored blocked pants are showing up for spring.   But I will leave this particular fabric combination to tall, young girls like Taylor Swift, who is wearing them in the photo below .