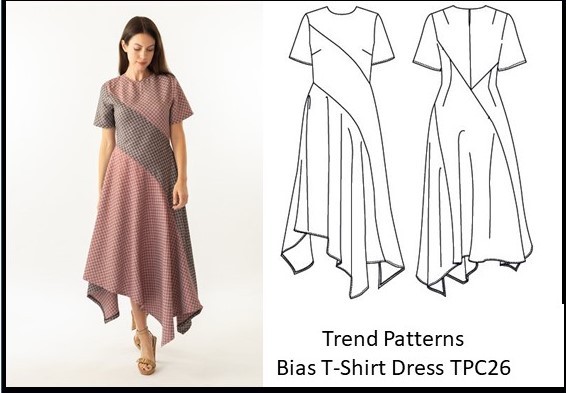
What appealed to me about the Bias T Shirt dress was the T shirt type top with bust and waist shaping, merging into bias cut panels forming a drapey skirt with irregular hem.
The Bias T shirt dress pattern is available as a printed or PDF pattern from Trend Patterns I purchased the PDF pattern, which at $27.37 USD is expensive. Especially when I had to print and tape together 70 pages. The few bloggers I found that had made Trend Patterns had been gifted the patterns, and the posts were either pablum or posies. There were more pictures on Instagram and they looked pretty good, so I decided to splurge. I was saving on gas, restaurant meals and haircuts. Why not spend money on patterns.
PDF patterns, I don't mind putting them together, which is what seems to bother most people. What bothers me is the heavier weight of the paper used in the typical home printer. It makes the pattern pieces difficult to pin to the fabric without distortion, and hard to fold and store. Yes, I could trace the pattern onto tissue paper. But that is another step I am not willing do, I have bought A4 sized tracing paper to try in a home printer, PDF printing experiment in the future.
Some vexations, I had with this particular PDF pattern.
Size Differentiation. The sizes were not layered in the PDF so that you can choose and print only the size(s) you need. The pattern pieces were differentiated by pretty colors for each size with minimal labeling. I would have preferred different line styles (dots, dashes and combos of these). I printed the pattern out in grey scale not wanting to use my precious colored ink. I had to rely on the limited size labeling and follow lines carefully through spirographic type intersections when cutting.
Dart markings - except for the smallest size, there were no lines, just starting points at the seam line and a point buried in a crowd of overlapping circles of X's, indicating dart apex.
I chose a mini navy /turquoise check material from the deep stash. It is a rayon blend of some sort. It was one of the few pieces of drapey fabric in my stash with the right weight, width, and length. This pattern takes almost three yards of 54-60 inch fabric.
The pattern has large irregularly shaped pieces that must be cut in a single layer. I moved furniture and cut my fabric out on the floor. A bit hard on the knees and my furry friends thought it was play time. Though I just realized they have a harder time destroying the heavier printer paper patterns than they do regular tissue paper patterns.
 |
| Pattern Layout |
Assembling the pattern and cutting out the fabric took the most time. The sewing goes quickly. There are good illustrations showing how to assemble the garment pieces. Other construction, such as sewing in the sleeves, is mentioned in a brief sentence with no illustrations. There is one pocket in an angled skirt seam and a zipper in an angled seam in the back. I inserted the zipper but when I found I did not need to unzip it to get the dress over my head (combo of bias fabric stretch and small bust), I took it out.
The finished garment measurements are given on the pattern instructions. I selected a size 14 with the garment measurement matching my measurements, assuming the bias would have some give. I could have gone down a size smaller. I took in the top on the side seams, but decided not to take in the skirt on the bias seams because size grading allowances was different on adjoining pieces. I also reduced the shoulder seam width about 5/8 inch. When I tried on the unhemmed dress, the longest point of my skirt was almost to the floor. I shorten the dress by trimming 1” off the hem edge and using a larger hem allowance to finish the bottom edge. I ruched up the sleeve ( zigzagged stitched over a piece of elastic) to give it shape and shorten it a bit .


My beautiful Mother's Day bouquet was on it last legs the day I photographed the dress, so I used it as a prop to memorialize it.
 |
| Trend Patterns Bias T-Shirt Dress |
 |
| Trend Patterns Bias T-Shirt Dress |
I like the dress very much. It is comfortable and the skirt is very twirl worthy. I also wore the dress that day for the backyard graduation ceremony we staged for DS #2. College was a challenge for him for many reasons, but he made it to the end, and was so looking forward to walking in the graduation ceremony and celebrating with classmates and friends. Covid 19 changed that. We made him wear the university cap and gown his girlfriend wore last year. He walked around the back yard while we played the "Pomp and Circumstance" graduation walking march on a cell phone (that music makes me tear up every time I hear it). His Dad presented him with a diploma and we all hooped and hollered and tossed confetti. It buoyed his spirits considerably. As did the virtual graduation party he had with his friends later that evening.
Ah, the memories we will have from the spring of 2020.


